Monday, February 28, 2011

Phonological Awareness- letter sounds

Ah!  Letter sounds...definately need to know the sounds of the individual letters to be able to "sound out" a word.  

A book used by many homeschooling moms had been recommended for reading and so I purchased it just to see what it was all about.  The name of that book was Teach Your Child to Read in 100 Easy Lessons.  It is written by Siegfried Engelmann.  Amazon.com carries this book ($13.02) as does Barnes and Noble.  The goal of the book is to bring those students, behind in reading, to a first grade level in 100 lessons.  My personal opinion, it's very dry.  However, it's a perfect guide for a homeschooling parent or a parent just wanting to give their child a head start in reading, especially if you don't really know where to start. (I do recommend you supplement the lessons with other activities.)   I started the book with both of my older boys at 4 years old.  We didn't use the whole book with Aaron (my oldest) because by the time we hit lesson 80 or so he was well on his way and found other books more interesting.  But yes, I agree, it takes them to the first grade level.  It gives the adult the words to say, it teaches the letter sounds that are most popular/used first so that children are reading right away.  I find that letters and letter sounds are very abstract to preschool students and many really do just need to have it made more meaningful by bringing in simple words and teaching the letters sounds as your are teaching them to read.  Letter sounds go hand in hand with reading, so it makes sense, right?  (A side note, I often begin teaching letter sounds using the beginning letters of the child's name and names of their family members and pets...it makes it more meaningful.)  I would like to state the order that they teach the sounds.  I do not feel that with either learning to read or learning to write letters, that anyone should follow the alphabet order.  It's just not practical. (That's for another day!)  Here is the order that Mr. Engelmann recommends.
m, s, a, long e, t, r, d, i, th, c, o, n, f, u, l, w, g, I (as in the word I), sh, long, a, h, k, long o, v, p, ar, ch, short e, b, ing, long i, y, er, oo, j, wh, y (as long i), long u, qu, x, z, ea, ai, ou
----------------------------------------------------------------------------------------------------------------------------- 
Our first focus for preschool students are beginning letter sounds then we move to ending letter sounds.  Eventually, they should be able to pick out words that do not have the same beginning or ending sound and then also be able to tell you what the common sound of a group of words is.


At the Head Start program I worked at we had a set of "Alphabet Tubs". These were from www.lakeshorelearning.com.  You can use these miniature objects for so many different activities. 

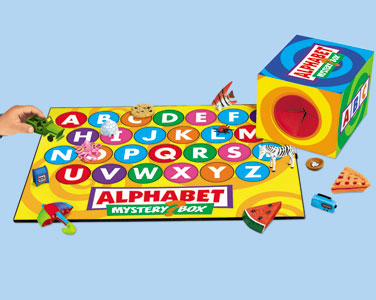
However, at $149 a pop, it's not practical for most homeschool families or even us home-based preschool programs.  So, you can do what I did and save a few pennies!  I started to create my own Alphabet Box of miniatures.  It's still in the process of making but I have at least 2 items per letter.  Clearanced out Christmas ornaments or seasonal decorations, the little painted wooden objects you can get at craft stores, small toys that the children have gotten here and there and so on.  Just recently we purchased the "Alphabet Mystery Box" and so that has added to our collection a bit.  You can make your own box or even use a tube sock for a mystery "bag".
 

Our Alphabet Foam Mats (I see them in various stores...you can also get them in numbers) get a lot of use here.
This is Caleb the week before school started this past fall.  So, obviously you can use them to create words.  Most preschool students will only have success with CVC (consonant-vowel-consonant) words.  I'd like to share a little "Dr. Seuss" (March 2nd is right around the corner) letter sound activity we did in the past.  I don't think I have a picture of it handy though.  Bummer!  Anyway, the children like to use these alphabet mats with our "Marching Around the Alphabet" song on our One Little Sound CD by Hap Palmer.  Another excellent audio CD!  (Of course, we got it from Amazon.com.  On their website they have a list of the songs for this CD if you are interested.)
The children put together the letters in a rectangle so that they can "march around the alphabet".  I typically don't worry about order the alphabet though, on occasion, we use it as a reminder of alphabetical order and we'll work together to put the mats in order.  The children then march around and when the song stops at it's various points, they pull the letter out of the mat and they each tell us what the letter name is (if they know it) and the sound it makes.  Older ones that know the sound I encourage to state a word that starts with that sound.  We march, jog, walk backwards, crawl, gallop, and etc to keep the interest.  At the beginning, you often have to teach them that they have to take the letter they are on when the "whistle blows"....otherwise they are running to "their letter"- the first letter in their name.  I encourage them all to look at what each child is holding up so they get the letter name/sound reinforcement also.  I think the minimum amount of times we've played the song in a row is 3.  :-)  The kids enjoy this!  So, our Dr. Seuss component.  Prior to the song I filled up a "Cat in the Hat" hat with an object from our alphabet box to represent each letter.  Then we passed the hat around and pulled out an object and placed them on the inside of the rectangle by the corresonding letter.  Then when we played the music, they all had a "word" to say because the object was right by the letter as a visual cue.  It's a good use for alphabet flash cards also. 

I love using songs with my students so, of course, I better give you a few letter sound songs to use!  Again, I do not know the origin of these songs so "author unknown".

Letter/Sound Review
Tune: Where is Thumbkin?

Where is (B)? Where is (b)?
Here I am!  Here I am!
Can you say the (B) sound?
Can you say the (b) sound?
(/b/ /b/ /b/, /b/ /b/ /b/).

 
Old MacDonald had an Alphabet
Tune:  Old MacDonald

Old MacDonald had an alphabet.
E I E I O.
And in his alphabet he had an (E).
E I E I O.
With an /e/ /e/ here and an /e/ /e/ there.
Here and /e/, there an /e/ everywhere an /e/ /e/.
Old MacDonald had an alphabet.
E I E I O

Be My Echo
Tune: Are You Sleeping?

Be my echo. (adult)
Be my echo. (children)
(M) says (/m/). (adult)
(M) sayas (/m/). (children)
Monkeys and muffins. (adult)
Monkeys and muffins. (children)
Mustard and marshmallows. (adult)
Mustard and marshmallows. (children)
/m/ /m/ /m/. (adult)
/m/ /m/ /m/. (child).
(Change the letter names, sounds, and words as you desire.)

There are many more ideas out there!  I'll share them as time allows. 

Sunday, February 27, 2011

Phonological Awareness

Yesterday, I touched on the importance of phonological awareness.  I included some rhyming ideas since that is one component of phonological awareness.  Today, I'd like to share a thought from Hubbard's Cupboard.  http://www.hubbardscupboard.org  This is a site you might want to explore when you have a few minutes.  (Actually, I often can spend a LOT of time with this site.)   She is speaking about having a balanced literacy approach.  I agree completely with this and try to incorporate activities accordingly so that each day we are doing something each component.  The more experience they have, the more likely to succeed in reading (and writing). It's not as hard as you think!


Reading to children
Reading with children
Reading by children
-----------------------------------
Writing for children
Writing with children
Writing by children

When we read to the children, one aspect of phonological awareness we can help children do is to recognize that words are separate units.  We do a lot of this by simply tracking print.  Again, this is something that often comes without a lot of formal instruction.  For example, the illustration was a picture of a fat cat on a mat.  We tracked the sentence, "The fat cat sat on a mat."  Then notice that the animal is a cat.  Can we find the "cat" word in our sentence?  Listen, /c/ /a/ /t/ (segmenting).  What's that sound at the beginning?  /c/.  Yes!  The letter c makes that sound.  Where is the word that starts with c?  Oh!  Right there!  c-a-t.  Let's sound it out (point to the letters) /c/ /a/ /t/--- cat (saying it faster and blending it altogether).  Great!  Let's go on. 

It sounds like it would take a lot of time to do that which I described above but in reality it's only taking about 20-30 seconds, especially after doing it several times.  They know what you are going to say and do and are already looking at the sentence for a clue.  You don't want to take the fun out of a book.  This is an activity best done in small doses, maybe once or twice in a book and only after it's been read at least once through.  Some things you did...
1) pointed out that letters together make a word.
2) pointed out that words make a sentence.
3) when tracking you tracked left to right (and maybe top to bottom).  Tracking requires fine movements of the eye and children need practice at this so it comes naturally.  Be aware that the inability to track due to vision problems will hinder their ability to be successful in reading.
4) listened to beginning sounds and reinforced other sounds in the word.
5) did simple segmenting of sounds and blending them back together again.
6) You are also teaching the children to use pictures as clues to reading.  When they are reading a bit more on their own that is something we teach them...if you get stuck on a word, look at the picture/illustration.  Does it give you a clue?  We're just doing it in reverse at the preschool stage.

There are other things you can do.  If you read through the book and then choose one page to focus on you can add even more components.
*  Predict what the sentence is going to say by looking at the illustration.
*  Count how many words make the sentence and talk about the simple punctuation marks-never to early.
*  Count how many letters make your focus word (such as "cat" in the page mentioned above).
* Write that word with air writing or in a sand tray and encourage them to draw a simple circle face, triangle ears, eyes, nose, mouth, whisker cat face.
*  Talk about the words that rhyme in the sentence.  Make new rhyming words from the main rhyming sounds.  So more -at words for example.  Even nonsense ones.
*  Note detail in the illustration.  Help your child become observant!  That will benefit them immensely!
* Encourage them to make a new ending to the story starting with your focus pages.

As an individual activity you can photocopy the page and give your child a highlighter to find a certain letter or all the -at family words or use a different crayon to put a line through (or under) each word.  I've been known to cut off the sentence and cut the words apart and encourage (for older students only) to put the sentence back together again.  Have fun with it!  The child might put "The fat mat sat on the cat."  Laugh...it is funny sounding.  Humor is important in learning...helps keep frustration down.  Then have them try again!  When you don't stress their mistake...they learn that it's okay to make mistakes (we all do) and we just "try again".  It also helps them not to be to concerned about "being right".  Some children won't "try" because they are afraid of making a mistake.  This happens when the person they look up to really makes big deals about mistakes.  They aren't big deals...it's all a learning process.

So that's reading to your child...track print whenever it's possible. 

Reading with your child...you do all the above but it's 1:1 and doing hand over hand with the tracking until they have that concept down.  Remember that it's the illustration that's going to grab their attention.  Don't rush through it.  Let them get their fill of the illustration before (or at least after) reading the sentence or else they won't track with their eyes as you want them too and they will just be letting you do the "work" of moving their finger.  The goal is for them to look at the words as you track it together. 

Reading BY the children.  Preschool children should have many opportunities to "read" throughout the day.  It doesn't have to be with books and it's going to look different than a Kindergarten or 1st grader.  You can encourage them to tell you/"read" cereal boxes, grocery ads, the Sunday comics, signs, etc.  "What do you think this says?"  And even further (especially if they are close) ask them "why do you think that?"  Or at least confirm what they are saying.  "Yes!  That says Kix!  Watch (track the letters, segment and then blend) K-i-x.  /K/ /i/ /x/ and then go fast!  Kix!"  Or, "That's was close.  Let's sound it out together." 

Of course the same goes for writing...but that's another day! 

I do want to mention a "favorite" book series that we invested in for our own family.  They are called the "We Both Read" series.  They start at the Kindergarten level and work their way up.  I find that the Kindergarten leveled ones work very well for preschool children and encouraging them to read.  We had "early readers", mainly because of the phonological awareness foundation laid early.  They were just ready for the next step.  One issue we had though was that they didn't want to "read on their own" even when they could.  It boiled down to that they were afraid we, as parents, would stop reading to them!  So these were perfect books!  A spread of pages would have a parent reading and a child reading.  I also liked that there were a few nonfiction/informational books in the series.  You can look through the books available through their website and I see you an even purchase them there now.  But I suggest ordering through www.amazon.com.   A paperback book runs  $4.99 a book.  It's eligible for free shipping and most of them are eligible for the 4 for 3 promotion.  Our local library system is starting to carry many more of them so yours might also.  Check them out!  The following pictures are from the actual "We Both Read" website.


Note the rhyming...that gives the child a clue to what their word or phrase is. 
As they work their way up through the levels there will be less rhyming but all the
K level books and most of the K-1 level books have a rhyming component. 

Saturday, February 26, 2011

Teaching your child how to read.

I've heard the question, "How do you teach a child how to read?" quite a few times.  It's good to think about that and want to support your preschool child.   My answer is often, there are many steps and it goes way beyond singing the ABC song.  :-)  Singing the ABC song is very similar to rote counting...it's all about memorization. 

Phonological Awareness:
I consider phonological awareness the foundation for reading.  It's what we focus the most on with our preschool students.  Many students can learn this awareness informally through songs and games done throughout the day.  For the most part, there really is no need for a formal instruction period.  But we do want to keep in mind that every child has different needs.  Phonological awareness activities can be turned into a game to help your transitions go more smoothly and they are great for car rides!

Here are some of the skills I work with my students on, with regards to phonological awareness.
* recognizing words as separate units 
* rhyming
* matching sounds (starting with beginning sounds)
* blending and segmenting sounds of simple words
* breaking words into syllables. (I call them "word chunks" with my students.)

Rhyming:
There is a natural progression of skills within this category (as with any category).
First, I work with the children in recognizing rhymes when they hear them such as cat/bat, house/mouse, spoon, moon.  Nursery rhymes are great for this type of learning.

Then I'm looking to see if they can discriminate between the words that rhyme and those that don't.  So I may verbally give them a set of 4 words and see if they can pick out the word that doesn't rhyme such as boat, coat, hat, goat.  Or I might give them a few picture cards and ask which of these cards rhyme with the word cat.  

And the final thing I check for is if they can begin to list words that rhyme.  This seems to be the most difficult skill.  Remember that nonsense words work for this type of work too and it makes the activity more humorous for children and adult.

One thing I do want to remember to mention is that rhyming activities help improve listening skills and we do want that for our children! 

A few ideas for you:

Using familiar tunes is a great way to incorporate rhyming activities throughout the day.
Tune: Wheels on the Bus
Can you say a word that rhymes with (cat)?
Rhymes with (cat), rhymes with (cat)?
Can you say a word that rhymes with (cat)?
Yes, (cat) and (rat) rhyme!

Another familiar and well-loved rhyming song is "Down By the Bay".
Down by the bay.  Where the watermelons grow.
Back to my home.  I dare not go.
For if I do, my mother will say...
Have you ever seen a (cow taking a bow)?  Down by the Bay.
   Bear combing his hair.
   Bee with a band aid on his knee.
   Fly wearing a tie.
   Whale with a polka dotted tail and etc

Another familiar rhyming "funny" is the "Did You Ever, Ever, Ever?" activity.
Did you ever, ever, ever (clap your hands to the beat)
Did you ever, ever, ever
See a "cow take a bow".
Oh no!  (put hands up in the air and then bring them down as you pretend to laugh).
   a dog kiss a frog?
   a pig dance a jig?
   a goat where a coat?
   a snake in the cake?
   a moose dance with a goose?

Books are another great way to help increase awareness for rhyming.  Don't forget about the library!  They have a lot of books available to us! Our favorite around here are Dr. Seuss books.  (Aaron just reminded me that March 2nd is coming up.  They wanted green eggs and ham for lunch!)

Word families are a fun way to introduce "reading" and rhymes to preschool children.  Once we created a "house" cut out of construction paper and then we glued on pictures and sounded out the words as I wrote them onto the house.  So, with a simple rectangle building/triangle roof shape I'd write -at on the roof.  Then we'd sort pictures of which had -at sound.  cat, rat, bat, sat, hat, mat, etc.  I always put a few that don't belong the family to see if they catch them.  Then after they were glued on we'd go back and write the word next to it.  Always use pictures with the preschoolers!

Here's a little activity that my students enjoyed.  Not sure where I got it from though so I can't give the credit to the person who deserves it.  I used a dry erase board but you can use a chalk board or washable markers on a window/sliding glass door.
   The Disappearing House. 

Draw a picture of a house being sure to draw a door, two windows, a chimney.  Also draw at least 2 flowers, a tree and a sun.    When you say the rhyme encourage your child to guess the rhyming word (remind them that it's a word in your picture...it works well to draw the picture in front of them talking about the name of each time) and then they say the word and erase that picture.
   Day is done, erase the (sun).
   Count to three, erase the (tree).
   I count to four, erase the (door).
   Find your key and erase the chim(ney).
   If you can do so, erase the win(dow).
   Here comes showers, erase the (flowers).
   There's a mouse! Erase the (house)!

You can create a simple rhyming word match by cutting out small squares of cardstock and adding corresponding stickers.  I find that using Print Shop or a program similar makes it really easy to create games for the children!  I almost always laminate to preserve the game.

There are lots of ideas out there.  These should get you started.  I'm sure I'll be sharing more as time allows.  Have fun!

Thursday, February 24, 2011

Audio CD's


We enjoy music in our program.  Here are two of our favorite CD's.  This first one is one we've listened to practically every day these past two weeks.  Cars, Trucks, and Trains  by Jane Murphy.  Very energetic and informative with regards to transportation.  Our favorite is the first song on this CD called Freight Train.  Today we looked at pictures of different train cars (specifically the ones mentioned in the song) and we talked about what could be on or in each car and why.  This week we also created a color train booklet which worked out perfectly with this song!


Another favorite is Rhythms on Parade by Hap Palmer.  This is a great CD for following instructions as well as exploring with rhythm instruments.  Again, very upbeat.  We use it frequently.
I very seldom purchase any CD's without first listening to them.  I recommend you do that also.  Our local library system has a grand selection of music CD's and I can interlibrary loan them if they don't have the specific one I wish to listen to on their own shelves.  It's saves quite a few pennies.  Both of the above CD's can be purchased through www.amazon.com


Wednesday, February 23, 2011

Alphabet Train Puzzle

Today we put together a "favorite" floor puzzle.  This is a Melissa and Doug floor puzzle.  The pieces are large and easy to keep clean.  When I looked at their site, they no longer have this exact puzzle but they do have a Train Alphabet Floor Puzzle that looks like it's all animals.  Puzzles are great for logical thinking and fine motor development.  Again, a lot can be grasped just by conversation.  You can reinforce the letter names, sounds, upper/lower case, how many "word chunks" (syllables) in the object name, rhyming, segmenting and many other phonological awareness activities.

Here is a song I introduced today and we'll be using it for the next while.  

Tune: I've Been Working On the Railroad (author unknown)
I've been working on the railroad, learning letter sounds.
I've been working on the railroad; here's the latest sound I've found.
I am sure that you will like it; it's the best one yet!

I've been working on the railroad to learn the alphabet.

This is letter (A); this is letter (A)
The sound it makes is /a/ /a/ /a/.
This is letter (A); this is letter (A)
The sound it makes is /a/!

I'm not a big fan of the "letter of the week" approach.  Yes, it has it's place and can be beneficial.  It works best with those children who have a good idea of what the alphabet is about already. And as the teacher, it's easier to make sure we spend time on each letter.  I like to reserve that approach for the older students when teaching letter formation, and even then I'm always planning some way to review the letters and work with the alphabet as a whole.  I find that many teachers who teach "the letter of the week" focus on that letter and then, even if unintentionally, they forget it.  A few will grasp it in that week but many will not, especially young ones, so it's very important to do activities and sing songs that use the alphabet or review the letters already taught.  The alphabet is rather abstract to many students and I find that many don't begin to really know their letters inside and out until they grasp that we use these letters to form words.  The Montessori approach has a great concept in their "moveable letters".  We want to provide opprotunities for children to explore with letter manipulatives to form their own names and simple words.  They can use manipulatives to "copy" words from the front of their favorite cereal or cracker box and etc. Once they understand that "I can put these letters to spell 'T-a-g', my dog's name" it becomes much more meaningful and fun to learn about the letters.  Have fun exploring the alphabet!

Tuesday, February 22, 2011

Transportation Theme

Continuing with our Transportation theme this week.  I'll share two of the many activities we did today.
Clip It!
This activity was a planned math activity, which also includes good fine motor practice. 
These are dollar store word strips.  You can use any theme of stickers.  I encourage children to clip the clothespins onto the card (fine motor and 1:1 correspondence), count how many stickers are on each card, talk about more/less and odd/even, and seriate the cards.  You can use longer strips (use sentence vs. word strips) to encourage counting higher, you can use pairs of objects stickers to encourage counting by 2s, you can create patterns with your stickers or have them create patterns with their clothespins.  You can also use these strips to encourage vocabulary, for example, one of my students didn't know the name of all of the vehicles so we were able to build on the knowledge he already had.  Simple and inexpensive to create and with a wide variety of options!

Transportation Printing
This kind of paper is what I put under the category of "imagination paper".  Imagination paper is just paper that has been tweaked just a bit to change the child's thinking a little.  It's so interesting to see how children react to the various types of paper.  I've used various shapes, sometimes a shape cut out of the paper. I've glue on theme related cut outs, used large shapes and lines of primary colors. I've made a large X in the middle of a paper once.  The key is to create the paper before you give it to the children.  You do not want to "draw" on their work after they have started.  I chose this paper for our printing because last week we did a land, water, air transportation sort and I wanted to see how they would respond to their imagination paper.  Obviously, my adult thinking was, light blue-sky, green-land, dark blue-water.  However, with open-ended art, we don't tell the children that nor do we tell them they have to print the air vehicles on the top, the land vehicles in the center, and the water vehicles at the bottom.  We just provide the paper, paint, and printing tools.  If we had told them they had to print the certain way, it would no longer have been art but a math activity.  But, what does this piece of artwork tell us?  We wouldn't want to "assess their knowledge" by this piece of artwork, would we?  It shows he doesn't understand, right?  Wrong!!!  The key is to listen to the child when they are working.  What a story we had about the rocket taking off from land and the truck that had an accident and fell in the water.  :-)  So just wanted to remind you that art work can be a great way to practice verbal language as well as remember that when using art as an assessment tool, be sure you are there observing and listening to what the child is saying.  And if they don't say anything (some children are very verbal and others are very quiet) remember to use open-ended statements and questions at the end.  "Tell me about your work."  :-)  Please respect those "quiet artists" and wait until the end.  Sometimes they are concentrating and when you speak to them they lose their train of thought and it's hard to get it back.  I've known some children who will stop working when an adult starts to talk to them about their work.  So know your child and their tendencies.  :-)

Monday, February 21, 2011

Alphabet Puzzles

I'm always on a look out for good Alphabet Puzzles. 

I found this one, Infantino: When I Grow Up Alphabet Puzzle (http://www.amazon.com/Infantino-When-Grow-Alphabet-Puzzle/dp/B000C24EWG/ref=sr_1_6?ie=UTF8&qid=1298320419&sr=8-6) not to long ago and it's a lovely addition to our puzzles.  Not only does it show upper and lower case letter but it gives a worker for each letter sound.  The children were very excited about this puzzle because it was "different".  It was round instead of rectangle and the center circle are pieces to make up a city or town.  A lot of good conversation came out of this puzzle!  Learning about community workers, what they do and how they benefit the community is a part of almost every preschool and Kindergarten curriculum.

As mentioned before, we do a lot of singing throughout the morning.  Here is a few ways to make the ABC song fun for the kids!  (As always, use a visual!  Alphabet puzzles work well for visuals.  Point to each letter as you sing the song).

Singing the ABCs:  Slowly sing the Alphabet Song the traditional way.  Then change the way you sing it.  Remember to ENUNCIATE each letter distinctly (L-M-N-O-P) so they don't blend together.
*  Monster version:  Sing with a loud voice.
*  Mouse version: Sing with a high, squeaky voice.
*  Opera version: Sing dramatically with outstretched arms.
*  Backward version:  Turn around and sing.
*  Upside down version: Put head on the floor and sing.
*  With a cold version: Hold nose and sing.
*  Underwater version: Put finger between lips and wiggle.
* Z, Y, X version: Sing backwards from Z to A (difficult but doable with help!)
* Silent version:  Mouth the words with  no sound.

Ask your kiddos how THEY want to sing it!  You might find some very interesting ways!

Sunday, February 20, 2011

Sensory- Water/Snow

Here is another simple but very fun for the kids activity.  They very seldom tire of it and we do this activity multiple times throughout the year. 

I provide them an icecube tray (white or transparent works best) and fill three slots 3/4 way full with water and color them with primary colored food coloring.  Then I set up paper towel or coffee filters and give them an eyedropper.  Let them go.  They'll mix colors within their icecube tray and I encourage them to drip some of the water on their towel or coffee filter.  As you can see, the colors spread on decent quality paper towel, as well as coffee filters.  With coffee filters we create little projects like coffee filter butterflies. 

For the winter, we vary it just a bit and provide 3 cups of primary colored water and place them inside of a container of snow.  

With snow, we also use washable markers and soap pump bottles with colored water.  Ice cream scoops add another dimension to their play as they create different "flavors" of icecream and scoop it into bowls.  I hear we are in for another snowstorm...might be an opportunity to try it out!  :-)

Saturday, February 19, 2011

Sensory-Water Play

We love water!  Really, what kid doesn't?  Prior to having other children in our home, we did a lot of our water play right in the bathtub or at the kitchen sink.  You can too!  Now we do most of it in our sensory pool.  We place a towel below our water container to catch the majority of the drips.  Still, "in diaper" children often just have clothes removed because they are young enough to really get it all over them.  Potty trained children usually have a bit more control.  With my younger preschool students I often use a plastic paint smock as our "water smock" and that protects a bit of their clothing.  But...if it gets on them...it's water and we don't worry all that much.  :-)

What can you do with water? So much!  You can simply provide water with two cups and they'll explore for quite awhile.  Typically, less it better...when it comes to beginning sensory play.  Especially if you have a certain skill you want to work on.  For example, below you will see a picture from awhile back and you can probably guess what my main goal for them to do was.

Yes, I wanted them to use those muscles in their hands to squeeze those bottles.  Obviously this was not the first day using these bottles because there are other tools there.  Typically when I introduce a new "tool" I use pretty much that tool only, so for example, I would have provided a couple of squeeze bottles and maybe two different sized containers.  I add decorative rocks for two reasons.  One being that when they get wet, they get shiny.  Also, adding rocks to water usually turns into an exploration of displacement since they will eventually put the rocks in the containers, thus various sized containers being available.  I have had older students create rivers and waterfalls using the rocks.

Other ideas for water play:
*  add color to a squirt or soap pump bottle.  I've done two pumps or two squirt bottles with two primary colors of water.
*  add dish detergent and manual beaters to create suds.  We've also used an old grater and grated soap and then used the beater.
* small pitcher and cups (check your dollar store for lots of tools to be used for sensory!)
* fill an icecube tray up with water and drape a piece a yarn so it dips into each section.  When it freezes, pop it out and you have an icecube train. 
* add water to other sensory such as sand or dirt.
* spray bottles.  A Mailbox idea is to cut out flames from orange and red foam (they float) and encourage the child to "put out the fire". 
*  foam shapes that you can get at Meijer and craft stores all float and then stick to the side of the container.
* objects inside of the container such as foam shapes, confetti, rocks, aquarium gravel, pennies and etc and a sieve.  You can make your own sieve by using a plastic container and poking holes in the bottom.
* eye droppers or basters
* sand/water wheels
*  add a ramp and let them roll items down it and see the results.
*  wide and narrow necked containers and funnels
* a regular cup and a cup with holes at the bottom
* we've used our play "kitchen aid".  They loved it.  Added a little soap to the water and when they turned on the beater it foamed all up.
*  we add magnetic and non magnetic objects to the water and "go fishing".  Purchased or home made fishing poles.
*  we add toy boats or make our own boats to float.
* we use our water tub to do sink and float experiments.
* we've used a baby bath as our "water table" and added just a wee bit of water, plastic dolls, washcloths, a bit of baby soap, a towel etc. 
*  hollow plastic tubing is really neat with colored water.  They'll need help to begin with or use it as a multiple child exploration.  You'll need a funnel and cup also.
*  During our farm week one year, we filled plastic/latex gloves with water and poked a hole in the tips.  They "milked the cow".  So funny!  They laughed and laughed.
*  Sponges are great for fine motor.  A montessori activity would have a tray with a container of water, and empty container, and a sponge.  Children would dip sponge in full container and squeeze into empty container and their task was done when they transferred the water.  I sometimes start out like that and then move to the pool so there can more more exploring taking place with various size and types of sponges.
* tongs and ping pong balls.  Good eye-hand coordination  Slotted spoons work well for this type of activity as well.

That should get you started!  The sky is your limit!  :-P

Friday, February 18, 2011

Sensory

Ah! Our favorite "center".  Typically it is the favorite center at many preschools and Kindergartens that I have visited. Sensory activities that are done away from the "sensory table" also grab the children's interest and attention very quickly.   Unfortunately, by the time they get to Kindergarten, time is taken up with "academics"---math and reading mostly---and their sensory table isn't available as often as it should be.  My opinion, of course!  Sensory play has many benefits and maybe I'll just link an article for you to read called A Handful of Fun:  Why Sensory Play is Important for Preschoolers.  http://notjustcute.com/2010/03/24/a-handful-of-fun-why-sensory-play-is-important-for-preschoolers/.  There is a lot out there on the internet regarding sensory play and preschoolers and I can also give you more info if you want to contact me.  I think I'll focus on the types of sensory play we have done in the past, for this blog.

Sensory activities are another one of those "must repeat" activities.  Children benefit from repeating them often.  A preschool classroom often leaves a certain material out for at least a week in their sensory table so that the children can explore the material often as they wish.  I typically use a material over each day throughout the week but vary it by changing out the "tools" that are available for exploring. 

This week, our activities were focused around the theme transportation. 

Monday, we started out with sand and vehicle counters. 

Tuesday, we moved to oatmeal (quantity issues...and I wanted to encourage more "multiple child" play). I kept the vehicle counters and added measuring spoons, cups, bowls, and containers with narrow necks.

Wednesday, I added wooden blocks to encourage tunnel and bridge making.

Thursday, we changed out the counters and added wooden toy vehicles. 

Next week, I hope to have more sand available.  We'll be dampening the sand so they can make hills and valleys and we'll put new toy vehicles in (ones that will make different tracks) and tp/paper towel tubes, and small boxes to make tunnels and bridges.

Sensory play material ideas:  (I've bolded the top 5 of what my kiddos have enjoyed the most.)
*sand
*water- with/without color; warm/cold; soap/not soapy; icecubes/no icecubes
*sand + water; sand + rocks
*dried beans
*uncooked oatmeal
*uncooked rice (can color the rice using rubbing alcohol and food coloring)
* squirrel feed corn (corn on the cob)---good fine motor to let them remove the corn from the cob.
* bird seed
* aquarium gravel
* popcorn kernals
* mashed potato flakes (later add water for a completely different experience)
* fake snow
* real snow (w/ eye droppers and colored water)
* dirt (then add water later---potting soil works for dry play but not well for adding water)
* cotton balls or pom poms
* shredded paper
* foam scraps
* styrofoam blocks, styrofoam peanuts
* bubble wrap and lotion or finger paint
* coffee grounds
* cornstarch and water (goop/gak-and I guarantee the adults won't be able to resist it either!)
*  fall leaves
* shaving cream
* playdough ( I usually put playdough in my fine motor category but it's sensory also)
* uncooked pasta (you can color with rubbing alcohol and food coloring)
*  "easter" grass
* buttons
*  cooked spaghetti
* pumpkins and pumpkin seeds
* yarn scraps
* petroleum jelly and foam shapes
* rubberbands
* shells
* fabric scraps
* flour (add just a bit of salt to keep it from poofing a lot)
* cornmeal
* corn syrup
* pudding/jello
* silly putty

Oh, the list is endless of what you can do.  I know there are some programs that are limited due to federal regulations and can not use "food stuff" but for those that don't have an issue with "playing with food" there are a lot of options out there.

I guess this topic is going to take more than one blog.  :-)  However, I do want to answer the question "so how do you do this?"

Most preschools have "sensory tables".  These are really nice, at the children's height so they can stand and/or sit at the table, have drains and often have lids.  We don't have that option here in our home-based program so the "next best thing" is what I call our "sensory pool".  We use a plastic wading pool with a plastic dishtub inside.  Most children are unable to really keep it "inside of the tub" so the wading pool helps minimize mess because I can just dump the material back into the dishtub when they are all done.  It defines the space so I don't have children wandering around with the tools or material.  They know that they can play with sensory inside of the pool only.  Mess really isn't usually an issue.  There are some sensory activities we do right at the table or even at the kitchen sink but most we do in our sensory pool.  Below is a picture of Trent in our sensory pool back in October during our pumpkin week.  It'll give you an idea of how we do it.  I'll have to go through my other pictures and see what I can find to post.

By the way, he is using a "bug catcher". 
 I purchased ours from www.discountschoolsupply.com 
and we use them in our sensory play often!  Works those
 "scissor skill" muscles without them even knowing.  :-P

Thursday, February 17, 2011

Open-Ended Art

Open-ended art is the way to go with preschool-aged children.  When we say "open-ended" it means that we provide the materials and then let them create without our interference and thoughts.   Something else to remember is that "it's the process not the product" that matters. There are times where showing a technique is acceptable, but in the end, remember...it's "their work" and whether they choose to use that technique or not is up to them.  If you really want them to use a certain technique then that's fine, have them do it...but then provide another piece of paper for them to do what they wish!

Painting is the easiest type of open-ended art.  You can vary it in so many different ways that it stays interesting.  Also, remember that children need repeated experiences.  It's often the adult that has the thought "well, we've already done that!" but the children need to be able to explore many times with the same materials.  So "no worries" when you repeat open-ended art experiences!  The product is usually quite different from one time to the next.

With our transportation theme, I had planned to do a car track painting activity.  Typically I try to provide at least 2, many times more, colors for the children to use in their work.  It's a great way to explore coloring mixing.  I love to hear, typically from my youngest student who hasn't experienced much of this type of work before, "Look what's happening, Ms. Amber!"  Back to the topic, we happened to have a thunderstorm this morning and we got on the conversation of what's happening to our road and yard (mud) so we decided to make a "mudhole" and use brown paint with our art experience.  The children loved it!  The picture below shows how I set it up to minimize "mess" and encourage children to work from left to right. 


Other painting variations:
*  Provide 2 different size brushes.
*  Work at the table one time and at the easel the next.  If you don't have an easel, put newspaper or plastic table cloth on the wall and under where they are standing and voila!
*  Vary your colors...primary, secondary, a color + white, a color + black
* Make your own paint tools!  Many kitchen tools make neat prints.  We've used yarn, straw, rubberbands, raffia, foam, sponges, potato mashers, forks, as well as some purchased texture painting tools, etc.
*  Don't forget fingerpainting! 
* Add texture to the paints. 
*  One day play fast classical music and "warm" colors the next day use the same tools but "cool" colors and slow classical music.  (Interesting results for sure!)
*  Paint with marbles in a shoe box or oatmeal container; use a large box and use golf balls and large marbles.
*  Sponge painting or cookie cutter painting.
*  Tape paper on a slide and dip a plastic ball and let it roll down!
*  On a nice warm day, use a water bucket and large paint brush out on the sidewalk.
*  Water down paint and put a big piece of cardboard up against the side of a fence, house, shed, etc.  Provide a big brush and show them how to dip and press at the top of the cardboard...it will drip down to make a neat effect.
*  Sponge rollers with a large appliance box to make forts or "vehicles".
* Water colors (water color/crayon resist is fun also!)
Oh the list is endless!  

Tips to minimize "mess":
*  Whenever possible use child size table and chairs.  However, many home settings do not have this option.  So, plastic table cloth over the table and booster seats on the adult size chairs.  If you do not have booster seats use a towel covered stack of telephone books or something similar.  Why?  When they are on their knees they often lose their balance and reach out and touch something you really don't want them to touch.  It's also a lot easier for them to wipe their hands on their clothes when they are on their knees vs. sitting right up to the table and arms right at the table level.
* Paint shirts.  I do have a couple plastic sleeveless paint smocks that I purchased from www.discountschoolsupply.com.  And I do use them.  But with children younger than preschool...it's easier just to strip them down to their diaper! :-P  With preschoolers, a old tshirt a couple sizes too big works nicely.  It slips over their own clothes and the sleeves usually go down past their own rolled up sleeves.  I typically have clothespins clipped to the bottom of our paint shirts to use at the neck after gathering the material so ALL of their torso is covered. 
*  Add dish detergent to even the "washable" paint.  It will help it easily come out of clothes, tools, and off hands...because yes, even some "washable" paint do not come out very well.
*  If you are using 9"x12" construction paper, a plastic tray works nicely to help keep the paint all contained.  For any size paper, roll masking tape placed on the back of the paper to secure the paper to the table.
*  Placing smaller amounts of paint into egg carton sections allow for less paint, easy clean up (just throw away) and the ability to use more colors without wasting too much.  You can always add a little more to the sections if a certain color is getting low!
*  I purchase a case of store brand wipes and we call them 'art wipes'.  These are perfect to help get majority of the paint off their hands before sending them to the bathroom to wash their hands! (Otherwise you will get a new paint color on your sink, walls, and cupboards if they are indendently washing their hands).  You can also have a bowl of warm soapy water and paper towel to rinse off hands also.

Have fun!!!

Wednesday, February 16, 2011

Graphing

We try and create a new graph weekly.  I find that graphing activities can help children in many areas, but, specifically, critical thinking. I also find that we tend to use a lot of verbal communication (which is something I'm always encouraging with my preschoolers).  Creating and working with graphs also allow for us to reinforce many of our most basic math goals such as sorting, counting, and talking about which set has more/less/equal.  There are several different types of graphs that I try to introduce with my students.  Today's was a very simple two way sort.  Our theme is Transportation so we sorted and graphed modes of transportation with wheels and no wheels.  We had some interesting conversation regarding the horse and the plane/helicopter.  They did agree on a column of where to put them, if they should put it in a column.  My youngest student kept saying, "The horse belongs on the farm!" 

There are many ways to create graphs!  You can use actual objects (which works well with children who are just beginning to graph), pictures, tally marks, color in or stamp squares, and so on.  There are many types of graphs you can introduce to your children.  Object graphs, picture graphs, symbolic graphs, and bar graphs.  Venn diagrams and glyphs are fun ways to show data also!  Typically we do object and picture graphs with a few bar graphs thrown in.  I find that at the preschool stage, they don't really grasp symbolic graphs well, they are pretty abstract, but that doesn't mean we shouldn't toss one in every once in awhile. 

Tips: 
*Whenever possible, let the children decide on the information and collect the information to be graphed. 
* Let the graph stay up for a few days and talk about it every once in awhile, asking your child open-ended questions about it.

For a transportation theme you could sort and graph by
* wheels/no wheels
* how children (or family and friends of your child) have traveled.  (This is nice to use for a venn diagram)
* colors of matchbox cars or other vehicles
* size of the toy vehicles you have around the house
* if you live near a well-traveled road you can use tallies to track how many certain colored vehicles drive past.
* whether the vehicle is use in the air, on land, or in the water.
* there are many types of vehicle manipulatives out there.  We use vehicle counters that you can get from Lakeshore Learning or Discount School Supply (and I've seen them at teacher supply store) to use for object graphs also.  Remember that you can add interest by hiding them in a sensory tub or throughout the room and the children go on a search and then graph the ones they find.  The following picture is from www.discountschoolsupply. com
* symbolic graph using two wheeled vehicles and a ramp.  Have them predict which vehicle will go the farthest after exiting the ramp and "test" them several times and using tally marks for which one goes the furthest each time.

Use your imagination and let your child's imagination go too!