Thursday, February 2, 2012

Kitchen Tools and Puffy Painting


Kitchen Tool Painting
 I find that some families hesitate to paint with their children because it tends to be messy.  Yes, it does.  But painting has so many benefits and there are things you can do to help keep the "mess" down.
Plan and Set Up
*  An old plastic table cloth that covers the WHOLE table vs. just where they are painting.  Paint splatters.  :-)

*  If your paint doesn't wash up well (even some washable paints don't wash out very well...especially anything with a red pigment)-then add dish soap to the paint.

* Plan that your child may wish to do more than one painting.  So have extra paper and paint available within arm's reach.  Why?  The most mess happens when you walk away to get something from the other room.  :-)  Better to be over prepared and able to supervise the painting experience.

*  In the picture, you can't see paint shirts but you bet that I use them!  They were on the back of the chairs as that's our routine, so the children can put them on before climbing up in their chair.  I like the plastic heavy duty velcro paint shirts (www.discountschoolsupply.com).  I tend to keep a clothespin clipped to the bottom so that I can clip the neck of the shirt so it's snug and covering all their clothes vs. hanging down and leaving their shirt exposed.  But an old shirt a couple sizes big or even an old adult shirt works just as well!

Microwave Puffy Paint Explorations
inspired by Pinterest
 
Recipe
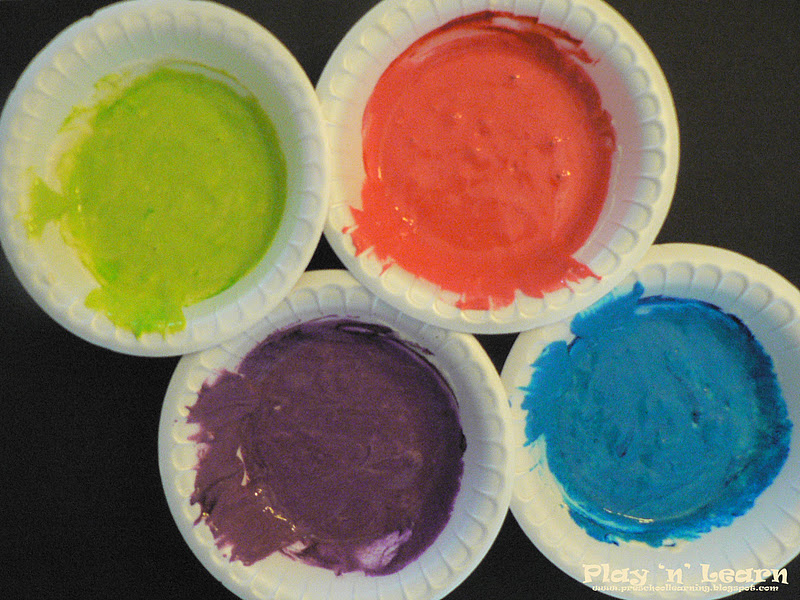
(enough to fill two Styrofoam bowls about halfway)
1/2 C. flour
2 tsp. baking powder
2 tsp. salt
Mix above ingredients together and add water enough to make a paste.
food coloring (added to individual bowls)

Our take:
*  Neat!  Pancake Puffy Painting!  :-) Yes...smells, feels and looks like pancakes!
*  Process art- I wouldn't recommend keeping these around for long.  Might call some critters!
*  Use food coloring liberally to make bold colors.
*  The thicker the paint is put on background, the higher it puffs.
*  20 seconds on average in microwave.
*  We started with q tips and moved to baby spoons.  The baby spoons were just about perfect!  Consider adding toothpicks to swirl.
*  Will we do again?  You bet! 

Wednesday, February 1, 2012

Fizzing Trays

Pinterest...I just recently joined the many others and what a great way to organize all the lovely ideas/resources that we have on the web!  I am not "addicted" (yet) as some seem to be LOL  but I do think it's going to be a great time saver for me!  Anyway...this was an activity that I saw on Pinterest and it's one of those "why on earth hadn't I thought of that!" projects.  The children LOVE volcanoes and the bottle balloons but not once have I ever just put baking soda on a tray for them to explore with.   So I remedied that and we did the project within a week of me seeing it on Pinterest.  :-P 

You need...
vinegar and baking soda
We chose to use primary colored food coloring to reinforce coloring mixing.
Of course I added a letter recognition component reinforcing H and K which are the two we are working with this week.   The cool thing is that my main two students have names that start with H and K.  Couldn't have planned it better if I had tried too!  LOL
There's my observer off to the right.  He loved watching the kiddos but was adamant he wasn't going to do this project.  Words I heard...it's fizzy, sizzling, sounds hot but it's cold, stinky, blue and yellow makes green (a color mixing song we sing), and etc.  Was so fun to watch them!  I intentionally set it up this way for these two.  K.'s right handed but H. goes back and forth between right and left hand yet.  Here he's using his right hand but for the majority of the activity he did switch and use his left hand.  K. is using her left hand here instead of her right hand.  Both children were encouraged to use their dominant hand after the initial exploration so that they were crossing their midline as they reach across to the bowls.  I also wanted them to share...so that they did have to wait a moment or two if they wanted a specific color and the other person was using it. 
A closeup of one spot on the tray...is that not cool or what?!
And!  T. decided to actually do this project after watching for quite awhile!  AWESOME!
Squeeze, release, squeeze!
And he touched it! 
Curiosity got the best of him and he started putting fistfuls of baking soda into the bowls of vinegar.  They all fuzzed up for a bit and then when they stopped he lost interest.  But this is awesome that he explored with this activity!

Highly recommended!  Your kiddos will love it!

Tuesday, January 31, 2012

K is for Kisses. (Hershey Kisses that is!)

Personalized Hershey Kiss
Awhile back I remembered seeing something similar to this in a search I made in Google Images.  If this was your idea...feel free to let me know so I can give you credit!  :-)
This was a "cute" project.  I turned it in into our scissors skill activity using cardstock.  Really I should have used cardboard so they could wrap the kiss in aluminum foil more independently but then they wouldn't have been able to cut out the kiss on their own.  Hmm...will have to ponder over this one and see what else we could do!

Hershey Kiss Letter Formation Reinforcement
Reinforcing H and K (Hershey Kiss).  Yes, I encourage them to form the letter as we would write it.  Last week we had a really short week for H and so I'm slipping in some letter formation activities this week for H as well as this week's focus letter of K.
K. completes her activities before H. most times and so this tray and Hershey Kisses were perfect for her.  She went on to create...
patterns                 and                 shapes.
She was actually in the the process of making a circle in the above picture but I snapped this picture because it shows that she is creating a circle using the "magic C" formation.  This is something I definitely reinforce over and over and over.

Hershey Kiss Number Line
First the children practiced writing their numerals on their "kisses"...with some children you may wish to do hand over hand while singing the numeral formation verse that corresponds.  They then glued in order onto their paper strip.  Then...
I had created small "flash cards" with simple addition and subtraction signs.  This is not "new" material...we've used number lines with addition and subtraction before.  Good foundation building for Kindergarten.  So they chose one of their "flash cards" and told me what number was first.  They put their kiss on that number.  Then they looked at their math symbol and then looked at me as I crossed my fingers and said "plus" and took one finger away and said "minus".  They then told me what their sign was...we reinforced that plus goes forward and minus goes backward each time.  Then they moved their kiss accordingly, said the answer and then wrote it on the back of their flash card.  FYI: Somethings I would do differently- for more than one child ... arrange them so they are all sitting with their number line in the same direction.  My younger student got confused with the forwards/backwards mainly because he was watching K. and it looks the opposite in that regard.  They learn a lot by observation so going back and forth between these two instead of working independently was very benefitial.  I'm also considering creating a visual to go along with plus goes forward on the number line and minus goes backwards.  Should be relatively easy to do.  Typically I use only addition or only subtraction with preschoolers but decided to challenge the children today and help them notice detail by mixing the two together.

A little closer up image...we went up to numeral 10 on the number line.

Monday, January 30, 2012

K is for kite!

Symmetry Blot Kites
This project required several steps....we started this project first thing and it was completed, for the most part, before lunch.  We just did other activities in between each of the steps that required drying.

1st:  Mixing white and blue paint together to get the *perfect* shade.  Remember when mixing colors that you always start with the lightest color and add a little of the darker colors.

2nd: Painting the background sky color.

3rd: Adding clouds with a sponge, since it is mentioned in the song we sang (see below).

4th: Cutting the diamonds/kites from scrap paper.  Great use of scrap paper! Last week we did hearts this same way.  It's a skill that will benefit them as they get older.  I had a child once who after we had done this folded paper cutting for awhile he started stacking the papers together (other projects) with things I wanted him to cut out that were the same shape.  He told me that if he could cut with our folded paper he can cut his other paper quicker by putting them together.  Wow! Awesome for a 5 year old!

5th: Painting a design on one side of the kite, we used qtips, and folding over to print it to the other side.  FYI:  some children-especially younger ones- will paint both sides of the diamond.  That works just fine as well.

6th: Gluing onto the background and adding other details to create the final display.  We used yarn as a string of the kite.  Squeezing glue bottles are great fine motor as is tracking the yarn along the glue and pressing it in.  You may wish to have a wipe nearby for those children who have a "glue on my finger" issue. ;-P

Kites Song
Tune: Twinkle, Twinkle, Little Star
See my kites up in the sky
Flying past you, oh so high
With the wind, they move so fast
Watch the clouds, moving past
See my kites up in the sky
Flying past you, oh so high!

---author unknown---
If you know to whom I can give credit for this song, please let me know and I will do so.

Hoping for a week that will go smoothly...after the past three weeks one kind of wonders "what will happen next?"  I'm glad to see the snow coming down so beautifully...but a snow day means another missed day and we've already miss so many because of Ms. Amber's situations.  Oh well, go with the flow!

Wednesday, January 25, 2012

Hearts Misc.

Well, after our family coming down with the flu (nasty virus that was!) and I miscarrying the same week, which ended up being an incomplete miscarriage and took until the next week to complete and now I'm down and out with back trouble.  That's three things...now things need to start looking up again.  :-)  So, by afternoon today I ended up calling my chiro to ask when I should begin worry about the needle pricking sensation going down my leg.  So he changed his instructions from minimal walking and staying off my feet and no soft surfaces to laying down.  Don't sit much.  Well, that's almost impossible with kiddos around this house.  So, once again I'm having to cancel.  Sure has been an interesting few weeks.  K. has been with me since an infant thought and today she proved to be very flexible and helpful.  So, instead of Ms. Amber working directly with her and up and down on the floor with her I asked my husband to bring in my hearts tub and I quickly created about 10 independent work trays on my cart.  She enjoyed this change of pace, really.  But we surely didn't get done what was on my lesson plans as I was not able to stand long enough to gather my materials or finish prepping the materials.  So glad for flexible children and for my cart that I purchased this past summer! 

This cart is ideal for organizing and I would recommend it to various people...especially homeschoolers.  Though I will not be offering a formal preschool/child care program next school year...I do plan to use my cart for my youngest's preschool years.  I didn't get pictures of everything she did today and she didn't use all the trays either...we'll save them for another day...might as well turn this into a H is for Hearts week.  :-)

Heart door hangers and heart animal foam stickers.
  Simple independent craft that encouraged fine motor.  Peeling backings of of foam stickers is great for little fingers.  Great conversation between the two also.  And K. was such the helper!

Heart Design Do a Dot Page
Again, was neat to observe and listen to them working together.  T. is really maturing.  They had a thing going here where K. would stamp (T. didn't want to...surprise, surprise) and T. would twist the cap back on.  :-)

OTC Heart Linkies
Little plastic hearts that linked together.  This was our transition into Ms. Amber needing to go lay down and get relief from the "electrical currents" flying through me leg.  So we moved to the bedroom with her next to me so that I could continue to interact with her.  She created a chain as long as I was.  :-)

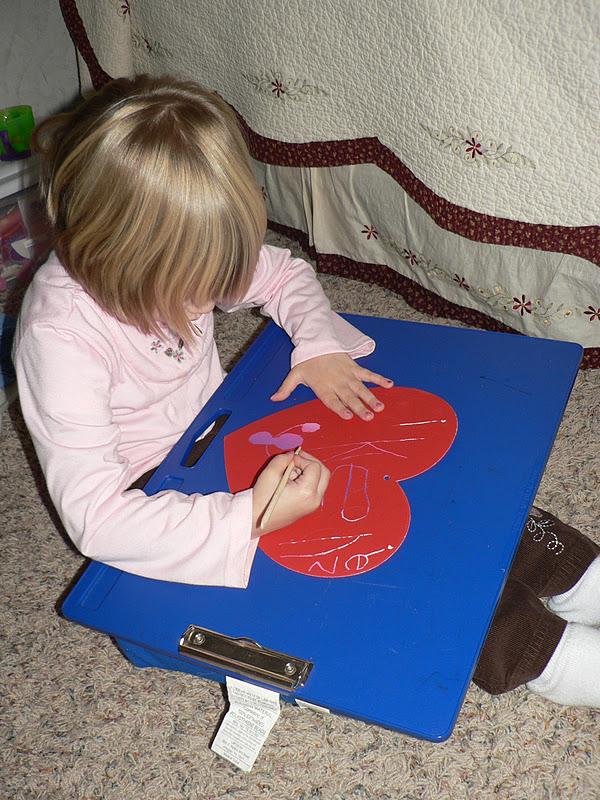
OTC Heart Scratch Board
Scratch boards are great prewriting experiences!

Heart Match It!
A very simple game I had created.  We each took turns rolling the dice and covering the number if we had one left on the board.  Was neat to see that she is starting not to automatically count the spots on the dice but knows what they are without counting.  Yeah!

 Heart Scissors Activity
Just simply had her cut out a heart from cardstock and then showed her how to use the stencils and then let her go.

So an "easy" day in some regards.  Not so easy in others.  No posting tomorrow as I had to take the day off since I don't know what tomorrow will bring after the ibuprofen wears off.

Tuesday, January 24, 2012

H is for Hearts!

I could do days and days with the theme of hearts...I have a separate bin just for that shape. And activity after activity in my heart file on the computer.  And books and magazines and... :-)  Hmmm...just got my invitation for Pininterest...bet I could find all sorts of activities for hearts I actually haven't even done before.  LOL But since I've had about 10-15 years of coming up with activities and "hearts" is a common theme...one could say that I've done plenty with hearts.  Usually I do it around Valentine's day, Mother's Day, Father's, Grandparent's Day and so on but these past couple years I've kind of steered away from the holidays and this year I'm doing more of a focus on our focus letter. Here are some of what we did today:

Scissors: Paper Hearts
Our scrap paper drawer was overflowing so today I reminded the children how to make a whole heart by folding the paper in half and cutting a half of heart.   Good use for that scrap paper!  These hearts were actually cut from previously painted/printed paper.  You know those projects that they make many many many prints/paintings because the process is so fun?  Yes, those papers.  :-)  We just hot glued onto their choice of ribbon.  They definitely like these!
Who says we can't have fun while "working"?!  :-)  These two were going to town with their jokes, laughs, and silliness today.  Love to see that!

Melted Crayon Cakes
"The Process" pictures really didn't turn out and this one isn't so grand either.  Just google recycled crayons or melted crayons and you'll find plenty of pics!
I don't know about you...but I always have a surplus of crayons around here.  Usually because the children and I both like to use the nice sharp crayons and instead of taking time to sharpen them...well, they are pretty cheap at the beginning of the school year so I always purchase a bunch.  So what do you do with broken crayons?  Yes, broken crayons are perfect for beginner writers.  Actually, I know many an occupational therapist who will break their crayons to make them stubs for those having some writing difficulties. It forces them to use the correct grasp (they can't fist them) and they can keep more control.  But as I'm winding up our preschool, I really have a lot of crayons so decided that I might as well start "using up" materials.  I found that there were quite a few school agers that enjoyed the no brainer task of tearing the paper off of broken crayons and breaking them into smaller pieces and then we created crayon cakes.  This was actually very calming for many of those children.  For preschoolers, this is a great fine motor activity as well.  Tearing the paper isn't as easy for the preschoolers but they definitely enjoyed breaking them!  Decided maybe we'd try making heart crayons this time around.  They didn't turn out all that well...really do need a mold just for hearts to make heart crayons but the only molds I had were heart ice cube trays and those aren't oven safe.  :-)  I usually don't use liners when doing this.  Back in the day I did this more often I had an old muffin tin that was used specifically for this activity.  Don't here though, so went ahead and used the liners.  They would be smoother without the liners but the process was enjoyed.  So tear the paper off the crayons, break the crayons into small pieces, place in muffin tin, place in preheated oven (250 degrees) for about 15 minutes.  The kids like to "check on the progress" so every five minutes or so we stopped what we were doing to see what it looked like.  :-)
For those of you that read M is for Melt...we did a few more melted crayons explorations with my own boys on Monday (snow day).  We found out that you can hold the blow dryer on it long enough to actually make a crayon fall out of it's paper.  :-)  They thought it was so cool since the wrapper was rock solid because of the melted wax.  We also found out that we liked the effect of melting the unwrapped crayons.

Heart Prints
 Prints can be made in so many different ways but I love to use heart paper doilies to make prints.  It's not the easiest for the kiddos but it does help them understand about the "helping hand"...their support hand since they must hold the doily in place while they are sponge around it.

Heart Candy Probability
This particular printable had white hearts but our box had blue so I just whited out the words and changed it to fit our heart colors.   In Kindergarten, they do a bunch with "tally marks" so this is good practice for my kiddos going into K. next year. 

Will let this be all for now...will share more heart themed activities at a later date.  :-)

Friday, January 20, 2012

M is for Melt

Today we had a play up at the school, that the 2nd-4th graders were putting on, to see so we really only did our calendar/reading activities and this melting experiment which was inspired by http://www.teachpreschool.org/.  I thought it was cool when she blogged about it and decided to try it out today.  It is pretty cool.   Messy...well, a little but nothing a plastic scraper won't take off!  LOL  Would I do it again, yes, I would.  It would make for a neat fireworks project!  We "hot glued" the crayons onto the cardboard/cardstock and use the hairdryer on high so it wouldn't take as long to start melting.  :-)
Even though I explained that the glue gun was a low temp glue gun and I showed her that I could touch it and get glue on me without it really hurting me...she still didn't want to use it so she picked her crayons and pointed to where she wanted them and I put the glue on the cardstock.  But really, a low temp glue gun works fine with kiddos.  I've allowed children use them under supervision many a time over the years.
K. really enjoyed this and her smiles were plenty with quite a few squeals of excitement as the crayons began to melt.  T.  enjoyed watching but didn't wish to participate.  My observer.  :-P