Showing posts with label kite. Show all posts

Wednesday, February 8, 2012

K is for Kites (All About Me)

Here is one project that I hadn't posted about yet.   Due to various reasons (mainly because we didn't get it done the first day and we usually don't have a lot of time for "make-up"/finish-up" projects)...we just didn't get to the final touches of the project.  So, today we did!

Very simple but an excellent activity. 
Scissor skills, literacy, art and could be used for various concepts.

We simply cut out the diamond shape from a 12x18 piece of construction paper and because we were taking the "all about me" idea, I put her first letter in the middle of the kite, block style.  It definitely worked out that her name began with K and we were doing kites.  :-)  But it would be no problem at all to put your child's first letter there.  She colored in the K with crayon-and then she painted over top with watercolors.  Later I had created bows with "all about me" fill in the blank sentences such as "My name is _________."  "My family name is _______."  I am ______ years old."  "My favorite color is _______."  She filled in the blanks and we hot glued the bows to her choice of ribbon. Again-simple but one I'd do again.

Other ideas...
Number Kite- have child write numerals on the kite bows.
Consider skip counting.

Alphabet Kite- write alphabet on the kite bows.

Name Kite- use as many bows as letters in child's name. 
Great for a whole class or family and comparing name lengths.

Pattern Kite- create a pattern of colors with the bows.

Texture Kite:  Use various materials or textured paint for the bows.

5 Senses Kite:  Represent a object/material with a drawing/picture on the kite and each bow representing a different sense.

Use your imagination!  I'm sure there are more ways to use these simple kites!


Monday, January 30, 2012

K is for kite!

Symmetry Blot Kites
This project required several steps....we started this project first thing and it was completed, for the most part, before lunch.  We just did other activities in between each of the steps that required drying.

1st:  Mixing white and blue paint together to get the *perfect* shade.  Remember when mixing colors that you always start with the lightest color and add a little of the darker colors.

2nd: Painting the background sky color.

3rd: Adding clouds with a sponge, since it is mentioned in the song we sang (see below).

4th: Cutting the diamonds/kites from scrap paper.  Great use of scrap paper! Last week we did hearts this same way.  It's a skill that will benefit them as they get older.  I had a child once who after we had done this folded paper cutting for awhile he started stacking the papers together (other projects) with things I wanted him to cut out that were the same shape.  He told me that if he could cut with our folded paper he can cut his other paper quicker by putting them together.  Wow! Awesome for a 5 year old!

5th: Painting a design on one side of the kite, we used qtips, and folding over to print it to the other side.  FYI:  some children-especially younger ones- will paint both sides of the diamond.  That works just fine as well.

6th: Gluing onto the background and adding other details to create the final display.  We used yarn as a string of the kite.  Squeezing glue bottles are great fine motor as is tracking the yarn along the glue and pressing it in.  You may wish to have a wipe nearby for those children who have a "glue on my finger" issue. ;-P

Kites Song
Tune: Twinkle, Twinkle, Little Star
See my kites up in the sky
Flying past you, oh so high
With the wind, they move so fast
Watch the clouds, moving past
See my kites up in the sky
Flying past you, oh so high!

---author unknown---
If you know to whom I can give credit for this song, please let me know and I will do so.

Hoping for a week that will go smoothly...after the past three weeks one kind of wonders "what will happen next?"  I'm glad to see the snow coming down so beautifully...but a snow day means another missed day and we've already miss so many because of Ms. Amber's situations.  Oh well, go with the flow!

Monday, August 15, 2011

We Like Kites

Kites are such a fun theme to do with the kids.  There are so many different things to do.  If it's a nice day/week...going outside and flying kites (even as simple as plastic grocery bags with a yarn string) is such a fun way to get the kids moving. 

I decided to have C. read the book for the other children today.  This can be a great benefit for the younger children because then they realize it's not that far away when they'll be reading too!  Anyway, my only issue was that C. tends to talk talk talk and it tends to interfere with the flow of the book for the other children.  So I don't have him read aloud too many times for the other kids.  :-)

 I chose this book as we've been introducing/reviewing the silent e and of course kite was a good example.  For our "moveable letters activity"...we seem to be moving beyond just moving alphabet manipulatives lately but this type of activity can be done with "adding e" manipulative...we used some silent e word cards that I came across. 
I chose a few to use, being sure to include a, i, o, and u vowels and that the words actually were common enough that the children would understand.  Great CVC sounding out practice initially and then adding the e to reinforce the long vowel sound.  These would be relatively easy to make on your own with your own words and font, if you desired.

For a bit of movement today, one of the children asked if we could do the parachute again.  Together, before the final child arrived, we put alphabet kites up on the wall in alphabetical order. FYI: I often encourage the children to start near the end of their sequence to figure out the next letter instead of all the way at the beginning.  By the end of preschool/beginning of Kindergarten they should be able to do this and it's a time saver!  I do the same with counting.  Start at 10 to get to 15 instead of starting at 1 each time. 
 So we got the parachute out and I placed on several kite bows that had pictures on them.  This printable came from www.makinglearningfun.com.  They tried to keep them on the parachute as long as they could.  Then I instructed them to choose a certain amount of bows from the floor.  (We did 3 bows a piece at first-I had created bundles of bows to make the activity go smoothly).  Then they told me what letter the picture/word started with and placed it on the corresponding kite string.  After they got the idea we did two bundles and they picked six a piece.  Had a little fun with the tape.  :-)

For our numeral formation activity, we did the Kite Graphing Book found at www.confessionsofahomeschooler.blogspot.com.  I actually purchased the Letter of the Week "curriculum" from her as it took so long to download the items individually and she has some very nice printables to share.  Just want to take a moment to reiterate that one must be careful of the term "curriculum".  Many of the printable available should be labeled as curriculum support vs. leading people to believe that it's an actual curriculum.  My opinion, of course!  Her Letter of the Week Curriculum is really just the printables she used for her lesson planning for the specific letter they were focusing on. 
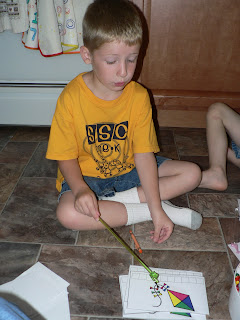
 I provided pointers because it makes counting a little more interesting and the bows were small enough that the pointers made it easier to count also.  I encouraged the children to x out the boxes...mainly to save time but also because the two younger ones needed practice forming x's.  That's not an easy letter to write...though it looks easy.  That crossing midline and backwards diagonal.

Art:  We talked about the different kites we have seen and the fact that not all are diamonds.  So, they made a kite collage, including white oil pastel clouds and washed with blue water color. 
 

Scissor/Word Family Activity. 
I printed a set for each child and on cardstock with the hope that they'll read and sort the cards at home for further practice.  However, you may wish to make one set and laminate.  You can do something similar as we did with the parachute.  Or you can hide the bows around the room.  Or put a paperclip on the bow and create a dowel/magnet "fishing" pole.  If you were planning on making/laminating one set, I would suggest you take the time to cut the bows out as well.  It would be more appealing to the eyes.  However, I knew that my students wouldn't have the time or the interest in cutting out all those bows!  So rectangles it was.  FYI:  on the website, they have many word families available for this activity.

Phonological Awareness: Beginning, middle, ending sounds
This went well and there are multiple things you could do with this simple kite mat.  As you can see in the picture, I used picture/word cards and a chip.  I purchased the cards awhile ago in the school section at Target.  I love them!  Now, they've gotten used quite a bit that a few of them are all coming apart at the perforated edges so we'll soon need to find a new use (maybe use them with our moveable letters!).  But they can fold to just show the picture and then open to check their work when we leave them all together.   Also, for younger students, consider using the mat to practice with sets of 3.  They can place a manipulative on each bow and count them, then set them aside.  You may wish to have small picture cards and do "which is different?" activity.  So maybe a banana on the first bow, a pear on the second and a dog on the third.  Encourage your child to tell you why the one they chose is different.  How about reinforcing rhyming?  Which picture doesn't rhyme?  Or which picture doesn't start with the same beginning/ending sound?  You can add bows to your string and do sequencing or patterning.  If you have time...have the children decorate their own kite.  Use your imagination...feel free to share other activities you can think of to use with this simple kite mat.

Here's one of the products I purchased from Discount School Supply this fall.  Already I love it!
Relatively durable/stable...which I could not say for others I looked at at the stores.  This one came with 10 trays.  The trays are not as durable as the previous ones I purchased but they'll do.  I decided to use it last night by arranging the materials for each activity on a separate tray from top to bottom.  That way I just took the stuff off the tray instead of it being piled on the floor or on the table/counter and so on.  And by the time we got to art we had emptied a few of the trays so I used it as a drying rack so no wet art on my counters as I'm trying to get ready for lunch.  Then instead of making umpteen trips to pile it all up to put away later...I just rolled the cart into the computer room.  :-)  I can see that it would be lovely for a homeschooling mom...especially if their child did well with a visual of when they they will be "all done". 

Today was a great start of the week....my only issue now is the doctor's office has been busy for over an hour (which this is NOT unusual...drives me bananas).  Need to make an appointment so I can get my child care renewal paperwork in.  Have a lovely week! 

Thursday, March 24, 2011

Weather Theme-Misc

Pretty emotional day for me today so we'll keep this short because my brain is a bit "mush".  I see I have a few pics from the day before the snow days I'll share . We didn't get to the rest of our activities- rainbow- due to the snow so perhaps when we get back from Spring Break it'll be a little more appropriate!  Though, we do talk about how Spring brings MANY types of weather.
Here are the children doing the actual sunshine seriation and sort.  
It went over very well.  Even Trent (not quite two) sorted a few rays between the 2 smallest suns and got 90% of them correct!  Goes with his sense of order I'm sure.

Our sunshine salad.
Well, this is lemon jello in whipped topping for the "sunshine" and pineapple tidbits for the rays.  We strive for a corn syrup free menu. Unfortunately, the day we planned to do our sunshine my whipping cream was spoiled.  So we did it the next day with whipped topping.  Tasted good but had cs.  :-9  They all enjoyed this.  In another blog, I'll talk about recipes.  :-)

Windsock
Lot different than the typical way we do windsocks.  Here, it's a storage bag that they cut from the bottom in strips and put stickers on both sides of the top half.  (I had precut a sliver off the bottom already for them.)  Hole punch the top and tie yarn at each hole to make a loop (keeps the bag open to catch the breeze).  They seemed to enjoy these.  I thought the bag would be hard for them to cut but it was really easy-almost too easy!  Stickers add a nice fine motor component.

Well, I thought we'd make a rainbow windchime but it changed a bit.  :-)
We're not done with these yet but this is the process.  The child and I talked about the weather cards and about the weather they like or dislike and why.  Then they chose one to draw and dictate about.  Here K. chose lightening and her sentences were "I was scared of the lightening.  I wanted to be with Mom and Dad."  The other two children wrote about weather they liked.

Then the child went to the next center where I had yarn and beads waiting for them.
This is the part they need to finish.  It's very time consuming for them and better for them to work on it little by little.  They chose what color yarn, how long it was going to be, the color of beads and how many they were going to put on them.  One child even created an ABBABB pattern!

And Mr. Trent didn't want to take a morning nap this particular morning so here was his "task".  :-)
Pipecleaners work best with little ones with minimal lacing experience or control.

That Incredible Foam I was looking for for St. Patty's Day?  Well, I found it!

These turned out nicely. 
We were running out of morning time so I didn't get a dictation sentence on them but they did think they were cool!  Notice the obvious differences in them.  Can you tell that in picture one, the child wasn't here when we focused on clouds?  There is also an interest factor playing in here also.  Picture two, there's a little sun up there in the left hand corner.  He does great for his age with representational drawing.  I don't normally see it at a young 3.  And his clouds are very typical for preschool aged children.  Picture 3...YEAH!  I don't expect them to remember all the cloud names and such but this picture shows me she grasped something.  Typically she'd do clouds like the second picture.  Also a bit more detail in her picture with a couple flowers with her sun.  I heard her tell her daddy one afternoon "I learned about clouds today!"  Not very often can we get preschool OR school-age children to tell us something they learned that day.  :-P