Showing posts with label rhyming. Show all posts

Friday, March 2, 2012

A is for Animals- Farm

Old MacDonald Had a Farm
Felt set, book, CD from Lakeshore Learning

Review:  The children love this felt set-especially being able to put animals in and out of the barn.  However from an adult perspective, the song on the CD goes very quickly and has a lot of "noise".  :-)  Not really toddler friendly but the preschoolers tend to keep up.  Also, the animal sound words in the book are not what are sung in the song.  Hmmm!  But overall, the materials are relatively high quality and you could always purchase the felt set separate from the book and CD.

Weekly Reader: Baby Animals

After Old MacDonald, we read our Baby Animal Weekly Reader magazine.  Then matched adult animal to baby animal.  Great vocabulary builder for toddlers.  I chose this simple match because I have a toddler here that is getting close to preschool age and sits in with us during group times.  I love the Montessori materials available for animal families though.  Male/Female/Baby.  Here is one link with free cards you can consider.  www.mymontessorimoments.com/2011/01/28/farm-animal-families/.


Farm Animal Rhyming
A very simple way to see if my students truly understand the concept of rhyming.  Like any activity that uses pictures, it's best to go through the pictures with the child so that the correct word is being used.  For example, there is an arrow pointing to the adult horse and the word we used here was mare.  Also, the rhyming word for cow was plow.  Jeep is another one that would be good to review.  For a copy of this printable click here-Farm Rhyming Printable.

Count and Compare
An excellent activity to reinforce math vocabulary, counting and numeral formation.  Feel free to print a copy for yourself. Count and Compare.  The way I created it was so that each numeral from 1-10 was represented.  I used this activity as an assessment, observing for counting with meaning, understanding more/less, and numeral formation.

Farm Animal Pattering Strips

The children love these strips!  The main reason is because they can make noise!  :-)  We use the animal sounds vs. saying just the animal names.  These are relatively easy to create. Would be great for a transitional activity in a larger setting. You may wish to use different animals or different patterns.  However, if you wish for a set to get you started click here-Farm Animal Patterning Strips.

Who Lives by the Barn?

This was one of our scissors activities.  The student cut out the barn only.  Having the animal squares precut helped the activity move along in a more timely manner.  After cutting out the barn, the student says the farm animal name, says the beginning sound, states and then write the letter on the blank.  So, for example....horse, /h/ /h/, h, and then writes H or h. Side note:  I encourage them to draw a picture of themselves as the farmer on the barn door (there is a square in the pdf. file that can be used for the pattern of the barn door).  K. had a sad face on her's.  So I asked her why and wrote her reason on the back of the barn door.  Farmer K. was sad because a cow had hit her.  :-P  For your copy click here-Who lives by the barn?
Farm Scene Dictation
Digital cameras are a lovely addition to a educational setting!  Here we simply took a picture of her finished felt board farm scene and she dictated a "story".  :-)

Had more planned to share of the things we did this week but I lost the majority of the blog somehow or another and had to go back and retype and upload the pictures/links again.  So all I have time for today.  Hope you find something useful!  Reminder that these printables provided are for personal or classroom use only.  Thanks.

Tuesday, December 20, 2011

S is for Snowman! Day 5

A few more activities with a snowman theme...
Marble Painted Snowman
Wish I had a large class for this activity!  They'd all be SO different!  Today I demonstrated how to draw a snowman filling a paper and encouraged them to use three circles to drawn their own snowman on their paper, freehand.  The newly turned 4 year old immediately started fist drawing circles so thus I recommend having two very different colors of crayons so that you can outline around their snowman as a visual of where to cut!  Then they cut out their basic snowman drawing, marble painted, glued to background and added details.  Simple and turned out lovely!
Ah...some day T. will actually participate instead of preferring to pull up a stool and watch.  It's kind of amusing.  He's very content just to watch.  A little different than my other two boys who were well into doing art, sensory, and other activities by his age but they all grow and develop differently.  T.'s an observer...especially with anything that might potentially be messy.

Melted Snowman Silly Putty
 

They did enjoy this (not T., of course...wouldn't touch it after the initial try!  LOL).  I purchased these from OTC for A.'s 3rd grade class as a little something for around the holiday times.  Since class numbers have dropped since I ordered the class gifts...my kiddos here are "benefiting".   It's a neat concept...the outside of the snowman tends to rub off...about a third of them came with paint rubbed off in spots on the containers and thus flakes get in with the silly putty but the kids don't seem to mind.  Good sensory activity!
We combined it with having potato flake trays also.  So with two sensory experiences...we didn't get to everything planned.  Oh well, some other time!
Snowman Colors
I did provide tweezers but they chose to use their fingers as the perler beads were really too little to manipulate to their button places with the tweezers.  :-)  Matching the hat to the snowman was great for color review and I love that they are labeled with the color words with the font I like the best.

Rhyming Snowman

I have a large selection of stamps, a garage sale finding.  You could just use magazine pictures or print some as well.  So, the other day I had my boys go through the stamps and find as many matching rhyming pairs of stamps they could find.  Actually there wasn't very many!  I was surprised there weren't more.  The picture is pretty self explanatory for how I created it.   The children enjoyed this and it was great review!

Thursday, December 1, 2011

G is for Goats!


There are so many versions of classic stories! I sent my husband on a search for the book The Three Billy Goats Gruff and the books that we could find at the library...well, I didn't really care for the version or I didn't care for the illustrations.  So today I decided to once again "listen" to the story vs. reading a book.  A very simple, "pleasant", version of The Three Billy Goats Gruff can be found at www.thestoryhome.com.  I did add this site to my favorites as it sees to have a good selection of stories!  With the The Gingerbread Man I added my sequencing cards.  Today, we just listened (while I "acted it out" a little...brought a few giggles) and at the end of the story I asked, "What do YOU think the troll looked like?".  Tee hee!  I'd love to do that with a whole class.  I'm sure there would be some great variations of a troll!  Would make a great display or class book.  Here is K.'s troll!

Retelling the story!
Very simple-wooden blocks, felt, stick puppets of the goats and a troll. 
Another picture to show it's simplicity.

Sink and Float
She knew right off what we were doing today, even though we hadn't truly done a sink and float activity this year yet.  :-)  Then, of course, there was time for free exploration.  Water is always a favorite.  There is just something about it that no child tires of it.   And you can vary it by adding color, bubbles, temperature and the tools can definitely vary.  Great sensory/science experience.    I was going to do a science booklet to go along with this book but there was already enough coloring and cutting planned today so decided to skip it.  So, instead, just simple drew two pictures- sink and float- water line on both.  Boat on one and an object down in the water on the other.  She predicted whether they would sink or float, tested, and then "recorded" by placing object in the correct column.

Rhyming with Goat and Troll
Mailbox Publication
Always trying to slip in rhyming as frequently as possible.  We slipped in the use of the sight word "the" since that word seems tricky for her yet.  Also used this time to label with "kid spelling".  Note that she wrote each sound she actually heard.  PERFECT!

G is for Goat by  Patricia Polacco
Alphabet book regarding goats.  We read this book and used it along with the goats tree map.

Goats Tree Map
This is one of the eight thinking maps that are being used frequently in our schools.  When they begin a "new" tool, I like to introduce it at the preschool level as then it's familiar (the brain connections are already starting to be created) and more easily to learn about and take the tool to the next level when they enter Kindergarten.  This particular thinking map I used to help create a visual on how to write a simple sentence.  Note the colors used.  Green at the top (where we start the sentence), red at the bottom (the end of the sentence).    I actually had a box for her to write the sentence in at the bottom of the sentence and then we cut apart the words and glued them to the paper she'd do her illustration on.  This reinforces spacing between words.  Side note about a tree map:  they work great with science/informational books, use to see what information they have retained!

When I think Kindergarten writing I think...
* Able to print in a way that's readable/legible.
*  Using beginning and ending sounds and some middle sounds when sounding out and spelling a word (some children may already be using more conventional spellings).
*  Correct use of sight words in their sentence(s).
* Basic punctuation.
* Spaces between words.
*  Illustration goes along with the sentence.  May or may not have much detail in either sentence or picture at the kindergarten level (our school's writing program is doing a lot with details in illustrations and sentences).

As a preschool teacher...my goal is to work toward the above goals.  I usually save the sounding out/spelling for activities where they are doing "free writing", such as journals, or labeling pictures and so on.  With an activity like this tree map, I like to do it "copywork" style because then I can point out conventional rules.  With K., we've been doing quite a bit with learning that letters together make words (CVC practice), words together make sentences and there are spaces separating each word in a sentence.  She's doing great!

Tuesday, November 8, 2011

O is for...

O is for Ocean!

Ocean Preschool Pack
This individual has really put quite a bit of work into these little packets and they are free.  We so appreciate individuals like Jolanthe who are so willing to share their work.  If you are one of these people...THANK YOU!  We used a few of the activities that were in this pack today.  I'll place and asterisk (*) next to the activities that were from this particular pack.

Line Tracing*
I was bummin' that this picture is blurry.  She was proud of her work (and should be!) and held it up to me to see.  Unfortunately, digital cameras tend to be a little slower in some regards and I couldn't really "recapture" this picture again.  These lines go beyond the basic that many sites offer.  Takes a bit more "pencil" control.  She did these lines where the younger child was only expected (though he could have chose differently) to do the basic lines due to the amount of effort it would have taken him.  Lines like this are perfect for beginner writers.  Helps to teach left to right, eye-hand coordination and helps them become comfortable with the various types of lines that we will be using as we explore with handwriting.  I laminated this set but to save money you can put the pages inside of sheet protectors and use dry erase markers.  You can use washable markers but they smear much easier, to the frustration of the children and the adults (who have to do the laundry).

O is for Ocean Letter Formation* 
 I encourage children to do "rainbow writing" vs. coloring of sheets like this.  Why?  Number one, coloring isn't something I push.  Actually, many of our activities go home uncolored because I give the option of coloring or not coloring.  Some programs do a lot of coloring sheets saying that it is "necessary for their fine motor development".  Yes, that is what they told me and I'm sure you could figure out what my response was.  Perhaps it does help to a certain extent but I've worked with too many children who find coloring frustrating/boring/tiring and there are so many other ways to strengthen and develop muscles in their hands that we do very little coloring.  With an activity like this, if they colored it, they are missing out on some lovely letter formation reinforcement.  I often place a green dot and add an arrow so they know where to start and which direction to go in.  Then I ask them to use colored writing tools to create a rainbow inside of the letter.  They must use at least three colors but they can use more if they wish. 

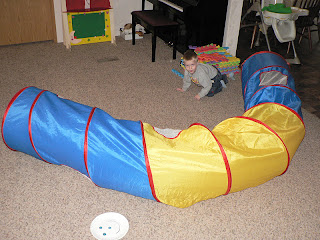
Tunnel Letter Formation
An activity that led into our letter O formation activity was our tunnel. 
Like this picture :-)
 Actually, I pulled out the tunnel for the letter C last week and though we played with the tunnel, we never used it for letter formation, for whatever reason, just ran out of time I guess.  C is for crawl, ya know! :-)  So, with Handwriting Without Tears, the materials all have a smiley face where the children start many of the letters.  However, with the magic C motion, it starts on the opposite corner.  We showed that on the HWT tools last week.  So to reinforce that idea, I created a simple paper plate smiley face for our C and O tunnel formation.  Tunnel moves a bit but it was in the right spot when we started.  :-D  We created a letter C and crawled through it and on O we started in the same spot but I "closed it up" for them to get a sense that they go right back to the beginning.  They enjoyed this, especially with me closing it up!

Water Transfer With Sponge
 I was talking about the various ways to strengthen hands besides coloring.  Here's one.  I'm sure I've mentioned this in a blog before.  I wasn't planning this activity but came across a whale sponge (you can create any shape out of a sponge) when I was looking for a different sponge this morning so quickly added it to our things to do.  :-)  They put the sponge in the bowl and squeezed the water into the measuring cup.  I added blue coloring to allow for a bit of self-correction.  If they spilled the water, they'd see it more clearly. And as you can see below, we got a little pouring practice in as well.  If you have never done an activity like this before...try it!  The children always love this type of thing and it has many benefits one being...it's very easy to set up and clean up! 

Eye Dropper Ocean
 Another water transfer activity that uses eye droppers.  To reinforce our focus letter I just cut out the center of a coffee filter.  They used blue, green, and purple watercolors to drip the colors on their O to make their ocean. When dry (I microwaved for 15 seconds and it was dry enough to glue)  it was glued onto a paper plate and they added ocean themed creature stickers.  I also provided a container so they could explore with various colors on a regular coffee filter as well.  They always do enjoy this!

Art:  Stenciling
 Check your dollar stores for these type of stencils.

Sensory:  Gel
 Just a little free exploration. I used the blue gel since we were doing ocean.  Added a couple tools and ship counters but my main goal was them to explore it with their fingers.  One "wondering" they had was if "this is what a jellyfish felt like?"  :-D

Oean Life Graphing*
 I ended up cutting apart the dice and putting the pictures in our large dice since I can never seem to make the cardstock dice work for me.  Next time I'll plan ahead and use larger pictures and add the picture labels on it as well.  The children took turns rolling the dice and we created a graph and went until one animal reached ten and then discussed it.

How Many Fish in the Ocean?*
 I decided to print this on cardstock and let them make their own and take it home to work with instead of laminating a set here.  Nice even lines perfect for scissor practice. They are narrow and a light gray so you may wish to reinforce them with marker or crayon if your child needs that.

Phonological Awareness:  Rhyming*
Just simply laminated this time since time was short.  Typically I'd cut the pictures apart and make an activity like this into a velcro board.  Always good to get some rhyming practice in there.  Don't just assume they "know it" after they get a few answers right.  On more than one occaision I've known children who could match familiar rhyming pairs (cat/hat, tree/bee, truck/duck) but give them pairs of words that are not typically used in rhyming activities (whale/pail, ocean/lotion) and they were unable to match them, thus they really hadn't mastered rhyming yet.  :-)  So slip rhyming in frequently and use unfamilar rhyming pairs also! 

Word Chunks/Letter Recognition*
The vocabulary cards are from the preschool pack. How we used them today was to find the o's in the words ("highlighted" them), if there were any and if not to reinforce that "none" is the number zero.  Then sort the cards onto the word chunk mat.  Can't see it all that clearly but the top of the columns are hand clapping clipart.

Hope you all had a lovely day.

Tuesday, October 18, 2011

B is for...

B is for bus!
We did several bus related activities today.  One of the first things we did was "switch up" story time.  I have already used the felt board multiple times to tell stories and so today I put up felt board "Wheels on the Bus" kit (www.discountschoolsupply.com) and at story time said, "Today, you tell me a story."  Of course, since preschool children are still relatively concrete thinkers and look around, and then make up their story with whatever they see right in front of them...the story was about the bus.  :-)  'Twas fun and when they get stuck on what to say next there are always lovely open ended questions to help extend it.

B is for Bubble Wrap!
Who doesn't love bubble wrap?  I love it!  Found 2 long pieces in my sensory tub clean out last week and thought...hmmm!  B is for bubbles!  So...one strip we put out in the living room for stomping and running on.  The other we added yellow-lemony smelling dish soap and yellow paint for a sensory/art activity.
Adding soap to the paint (even if it is washable) makes it a little more bubbly and easier to smooth over the bubblewrap...it smelled good too!  We painted the whole strip and then laid a big piece of paper across.  She enjoyed the patting the paper process since it was soft/padded and then you could see the circles that the bubble wrap made on the back of the paper.  We then worked together to put it up on the wall to dry.  Didn't take long...nice thing about bubble wrap printing.  I trimmed around to make a simple bus shape and she added wheels, windows and door!  Ta-Da... B is for bubble bus!  :-)

Highway Shapes
Cute little shapes made like a road.  They also have the alphabet and numbers!  I can see these being used frequently in the near future.  I know I've often used cars with letters and have them make car noises (letter sounds) as they drove on that particular letter.

School Bus and Students Rhyming
A nice variety of rhyming pairs...some familiar, many not!  Usually K. will just randomly pick a picture and randomly try to pick its match from the selection and often keep trying the same picture repeatedly but missing others (which usually ends up being the rhyming pair!) So today we learned how to go about it in an organzied way.  Laying out the buses, leaving spaces, laying out the students in a row.  She then chose a student and said it's object word, then started from the left top hand bus working her way down the column and then from left to right until she found it's pair.  She completed the task a lot quicker that way!  Just a little bit of individualization as she has a pretty decent grasp on rhyming and is much more successful in tasks when they are organized.  Teaching good organizational habits now will help when a child starts formal education.  That's one thing I really like about Montessori.  Very much into order and organization!

Paper Shape Exploration
I had cut the shapes in accordance the a directional art activity from
I tend to do these a little differently than most teachers that are doing directional art.   I think activities like this do have their place every once in awhile...but I definitely don't consider it 'art'!  :-)  We always do something in addition to activities like these that are more open-ended.  These are great fine motor activities, especially if you have tracers and scissors involved!  How I do these is I'll make one together with the children...encouraging them to talk me through it...so it looks relatively like the what the "realistic" end product would be.  Then, I put mine away.  I do not hang it up or show it to them again.  I put it away so they can't see it and then I give them the same shapes I had, usually with extras and let them create with them as they would like.  They never end up the same!  Love that!  With this particular bus...I loved that sop (repeatedly) on the stop sign!  Not sure if you can see that in the picture.  And there are people in the windows!

Probability!
Yes, we introduced the word but I don't expect preschool children to tell me what it truly is.  But we do explore with this kind of thing because then the foundation is being set and brain connections are being made and when they touch on it at school, they'll have an easier time grasping the concept.
Don't you love her expression...obviously she was asking a question! 
I had purchased lima beans for an alphabet activity, which unsurprisingly I hadn't gotten to yet.  Then I thought...hmmm, why can't I turn them into little people for our bus!  So, here is what we ended up with.  Six lima beans with a curly haired person on one side and a straight haired person on the other.  She first put the numbers 0-6 in a line, numerical order.  This is so that she had a visual for writing her numerals.  She shook the beans and dumped them out.  Then put the curly haired ones in the first windows and the straight haired ones in the last windows.  Then she counted them, putting the appropriate number above them and then decided whether they were equal of if she needed to use the alligator mouth to eat the ones with the most (more/less).  Then she recorded her information.  She did get duplicates!   This would be great for working with the number 6 and addition fact family!  She wanted to take this activity home so we packed it up.  I can make another one pretty easily.  The pattern was just a bus I had from a Mailbox publication.  Simple enough to create on your own and you can add as many windows as you want!

All for now.  The next few weeks will be relatively busy so...blogging might be sporatic.  Though on the other hand, it's a stress reliever so...maybe not!  LOL