Showing posts with label shapes. Show all posts

Friday, February 8, 2013

Shapes and Sensory!

Here's one of the activities that was a "favorite" for Mr. T. this past week.
This is "so him".  :-)  He picked through the shapes to find two of each kind to arrange them in this orderly fashion.  He almost had a heart attack when he couldn't find another yellow circle.  :-D  Had to help him out before he lost it.   Tee hee!  Oh my, I so wonder if this will carry through until adulthood.  This activity reinforced basic shape names but what I liked best was that it reinforces basic shape "drawing" twice.  1st he spread glue on the shape and glued them on the paper.  Then he squeezed glue around the shape to add his "snow sugar" as he called it.  It really was just a mixture of salt and glitter.  Later on he pointed to his paper and told me he really liked his snow sugar and wanted to do it again.  Wow!  He has come along way...this was an extremely messy activity for him (and me...it was everywhere!) but he handled it well and only washed his hands at the end.  (Very quickly after he finished though..."I'm done, I going wash my hands."  LOL) 
 
Have  I mentioned that T. is not an easy "preschooler" to plan for?  He's very academically minded and prefers order.  I really do not have time to work with him 1:1 during "school hours" so his activities have to be pretty much independent.  He doesn't care for the sensory or the art projects.  Heaven help me!  :-)  He definitely prefers something to do with...
 
numbers
(Dollar store Winnie the Pooh flash cards.  Together we set the numbers out from 0-10.  Then he matched the honey pots to the correct number card.  Then together we went through the number word cards.  These are neat because when they are all matched correctly, when flipped over, there is a Winnie the Pooh scene corresponding with the number so he gets the counting reinforcement again.)
 
letters
(Sandpaper letters-stick letters only, and an Othello game.)
Oh, he'll explore with sensory for...
5 minutes or so!  Usually takes longer to set it up.  :-D
Surprisingly enough, he dumped the rice into the pool on this occaision.  Typically he likes it contained in a tub with him sitting in a "clean" pool.  I remember my other kids and other preschool students playing in sensory for 30 minutes or more.  Just goes to remind us that every child is different.  :-)


Saturday, October 20, 2012

My "Academic" Preschooler

Those that know me well know that I really push that sensory-open ended art during the toddler/preschool years. T. is 3 years old and has had what I describe as "sensory issues".  :-)  He never liked to get his hands dirty...actually, still doesn't for the most part.  Forget any type of messy art...or sensory.  And really, the sensory tubs/pool does not keep his interest for long...even with "clean" materials. Do you know what he really likes?  Academics.  Huh?!  Yes, that's what he likes and thrives on.  So that is throwing me for a little loop this year as most "academic" type tasks usually requires some assistance when you are talking about a 3 year old.  But, we'll get it figured out!  Here are some of the activities we did this past week...
 
Matching numbers to pumpkin seeds.  Ha!  This was on a whim.  I didn't think he really could count sets past 3 so I put only 5 pumpkins down because then the shape would help him "self-correct" but no, I put down the 5 and he tells me, "all of them".  So I went ahead and so that meant there were 2 or 3 of the same shapes.  Oh my goodness!  I was impressed!  He did them all.  He couldn't really count the 9 and 10 correctly but the shapes then helped him but the rest he did on his own.  So, now I'm curious, was it just guessing or not...so now we'll explore that this next week.  :-)  And by the way, this was right up his alley of "fun". Ha!
 
He's really into pumpkins since we went to the neighbors and picked pumpkins.  We have such kind neighbors!  Matching has always come easy for him but again, this is right up his alley as "fun".
 
Measuring scarecrows.  :-)  The time he somewhat shocked me here was that he was getting to the 4th scarecrow and noticed the pattern 1 crow tall, 2 crows tall, 3 crows tall and he looked at me and pointed to the 4th scarecrow and said, "This 4 birds."! 
 
1:1 correspondence.  We'll do this again with different types of tweezers and the pumpkin erasers in a bowl vs. a bag.  I just hadn't planned for him to do this right at the moment but he saw it and wanted too and I didn't have the few moments it took to really prepare it how I would have liked to.  But he was happy!
 
Another favorite of his.  I do not put this under "sensory".  This is fine motor and he loves all sorts of tasks like this.  Very orderly...definitely appeals to his personality. 
 
Matching numbers..again "fun" for him.  He actually recognized them all but the 4 (which I don't use that font for 4 typically and 6, 9...understandably. 
 
Shapes are one area that he really hasn't grasped the names of.  He knows circle but more often than not calls is an "O".  Everything else usually ends up as a "triangle" as his first guess.  So we'll do more of that as time goes on.
 
Definitely another "academic" type activity.  Matching letters to spell words, these were fall theme words.
 
Oh boy, I think I have my work cut out for me.  The nice thing is that our schooling at home routine is starting to settle into a very nice routine...not as overwhelming.  We are figuring out when we need to do what...so usually I have the time to at least slide over to him and review what he did so we can get some growth out of the activities.  :-)  Have I mentioned that he loves "school" and when I don't set trays out for him...we all go a bit crazy...I learned my lesson! 

Monday, April 23, 2012

Flutter Flutter Butterfly!

This week we will be doing a lot of butterfly themed activities, along with our other non-themed activities.  Especially exciting since we are starting to see some butterflies around! 

A favorite song/chant...
Lovely pics...can you sense some sarcasm there.  :-P  Sorry. 
These were actually the best ones out of the bunch I snapped quickly to give you an idea of how I did it.
I do not know where I got the clip art from so will pass on sharing this document.  It's relatively easy to make though!  I used stickers on the one side of the cards and the chant on the other side.  We chant the alphabet part and then flip the card over.

Alphabet Butterfly Rap
ABCDE
I found a butterfly on me!
FGHIJ
She started out in a very small way.
KLMNO
An egg smaller than my toe!
PQRST
Next a caterpillar she would be.
UVWXY
In a chrysalis is where she'd lie.
Z
That's how my butterfly came to be!
Author Unknown 
If you know who the author of this chant is please make a comment so I can give credit where it is due.  Thanks!

With the older child we spent a lot of time with this thought of butterflies being symmetrical.  She really caught on this year!  Often I do introduce the idea of symmetry with butterflies but I don't often see children exploring with that concept during their play and activities.  But I did today!
We started off by checking out some butterflies in books,
and on some window clings (great toddler fine motor!).
Then we moved to our butterflies made out of foam shapes (which we had sorted earlier in the morning...love the conversation between the two kiddos about the shapes as they were sorting!)

Foamie Butterflies
Simply tape a basic butterfly pattern to the wall (this one was Mailbox Preschool, April/May 2002), and then tape contact paper over top, sticky side out.  This is a lovely activity for both toddlers and preschoolers and I expect my school-age boys will be at it this afternoon.

After K. was ready to move on we moved to a dry erase board where I demonstrated filling the whole board with a simple butterfly shape.  This "filling the page" is a bit more of a struggle for toddlers/preschoolers, thus I demonstrate on a larger surface when I'd like to see the larger drawings.  She caught on and so we erased mine and she drew her's and we took turn adding shapes and lines on both sides of the butterfly (somewhat symmetrical!).  Then she moved on to a large piece of white construction paper and did the same thing.

Water Color Resist Butterfly
She really took the time to add a lot of color to her work today.  I'm pretty sure this is because of our daily journals that we've been doing since we came back from Spring Break.  (Typical of her would be all one color unless I encouraged otherwise.)  For her journals, she brainstorms, draws, colors (at least 5), labels (at least 3).  This visual can be found on the Journals: Draw and Label post, feel free to use it with your own kiddos. We'll do the same this week and then I think we'll move onto adding a sentence.  She LOVES the labeling!
Oil pastels are awesome to use with toddlers.  So much more rewarding than crayons!  Small enough that they don't break easy, small enough to encourage proper hand grip, easy to mark and bold colors! 

Seriated Heart Butterfly
A lovely paper craft to work on tracing a pattern, scissor skills and reinforce that thought of symmetry.  Today, we also worked with the concept of a hamburger and a hot dog fold.  I'll have to admit that I couldn't figure out what they were talking about in my son's kindergarten class.  They used those terms often...hamburger and hot dog folds.  (Granted, I was only hearing the words not seeing the demonstration.) LOL   One day I was folding a piece of paper and it clicked!  Been using those terms since then.  So a hamburger fold is bottom to top fold of a piece of portrait orientated paper and a hot dog fold is bottom to top of a piece of landscape orientated paper.   Picture a hamburger bun vs. a hot dog bun.

Hearts pattern to fit on a 9x12 piece of construction paper can be download here.  Print and cut out of cardstock or trace and cut from a file folder or cereal box cardboard to make tracers for the children.

Anyway, she chose 4 colors for her wings.  Folded each paper hamburger style, chose a heart to trace (supporting with left hand, tracing with right), and then cut out starting at the fold so that she ended up with two exact heart cut outs.  Then she glue them with points touching, largest to smallest.  Later added a body and attenae and got a relatively symmetrical butterfly.

Coffee Filter Butterflies
An oldie but a good one!
I normally always provide eye droppers with coffee filter work but today I chose to provide paint brushes.  Well, after the first coffee filter K. asked for the eye droppers.  :-)  The children used them both interchangeably.  We are actually going to do this again tomorrow but with washable markers and only water with paintbrush. Color mixing and fine motor.

A few pics from today.  It's going to be a busy week!  Hope it stays as beautiful as it was today!  We went outside and was out there almost an hour.  K. said to me as we came in..."But we only stayed out for 10 minutes."  :-D  Yes, that beautiful.  And part of it could have been that Donnie got the teeter totter and the roller coaster out over the weekend.  They played with those for quite awhile before getting to their normal routine activities.  They are so funny... they do the exact same things in the exact order almost everyday outside.  Always throws them for a loop when I slip something "new" in there.   Have a lovely week! 

Thursday, February 9, 2012

T is for Trees (evergreen)

A couple other projects we did with evergreens in mind...
Theme shapes makes thing more "interesting" for some children...and definitely for the adults. We do understand that their work is important to them and so if are deciding to turn their painting into a shape-after the fact, please ask permission.  (That goes along with writing on their work.  Other options is to write on the back of their paper or on a seperate piece of paper and attach to their work.)  If they say they want to leave it "as is", respect that.  From an adult perspective...yes, their work isn't always "pretty" or "eye-catching" but it is the process that matters most.  Side note: as often as possible, let them cut out the shape.  Just draw the desired shape on the back of their art paper and they will see the lines just fine.
Since we were talking about the evergreens that are found around Ms. Amber's house, we use a small portion of the trees for painting tools.  Pine needles and etc make neat prints and designs.  If I were in a large classroom, I'd leave this tool out for a few days because they'd explore with it differently each time.  K., in the second picture, is snipping needles off of a small portion of a limb.  This was her idea that H. took to as well.  I hadn't planned it, but it worked out well.  If I HAD planned it I would have added a bit of glue to the paint so that the needles would stick better, but as it was, it did okay.  :-)

Shape Forest
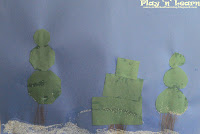
We were going to use shaving cream/glue puffy paint but they decided they wanted glitter so we used a mixture of salt and glitter for "snow".  :-)  The bottom picture is my son's after he got home from school.  His own take on the project.  Didn't use the pre cut shapes at all, added mountains, river and other details. They don't have an art teacher at the elementary they go to and the classroom teachers do very little to none "true" art, especially by third grade.  :-(  So he often wants to do the project that my students have done that morning.  Wish I had time to do more in the afternoon/evening with them with art.  We usually get to it in the summer but not in the school year...just too much going on.


Tuesday, January 31, 2012

K is for Kisses. (Hershey Kisses that is!)

Personalized Hershey Kiss
Awhile back I remembered seeing something similar to this in a search I made in Google Images.  If this was your idea...feel free to let me know so I can give you credit!  :-)
This was a "cute" project.  I turned it in into our scissors skill activity using cardstock.  Really I should have used cardboard so they could wrap the kiss in aluminum foil more independently but then they wouldn't have been able to cut out the kiss on their own.  Hmm...will have to ponder over this one and see what else we could do!

Hershey Kiss Letter Formation Reinforcement
Reinforcing H and K (Hershey Kiss).  Yes, I encourage them to form the letter as we would write it.  Last week we had a really short week for H and so I'm slipping in some letter formation activities this week for H as well as this week's focus letter of K.
K. completes her activities before H. most times and so this tray and Hershey Kisses were perfect for her.  She went on to create...
patterns                 and                 shapes.
She was actually in the the process of making a circle in the above picture but I snapped this picture because it shows that she is creating a circle using the "magic C" formation.  This is something I definitely reinforce over and over and over.

Hershey Kiss Number Line
First the children practiced writing their numerals on their "kisses"...with some children you may wish to do hand over hand while singing the numeral formation verse that corresponds.  They then glued in order onto their paper strip.  Then...
I had created small "flash cards" with simple addition and subtraction signs.  This is not "new" material...we've used number lines with addition and subtraction before.  Good foundation building for Kindergarten.  So they chose one of their "flash cards" and told me what number was first.  They put their kiss on that number.  Then they looked at their math symbol and then looked at me as I crossed my fingers and said "plus" and took one finger away and said "minus".  They then told me what their sign was...we reinforced that plus goes forward and minus goes backward each time.  Then they moved their kiss accordingly, said the answer and then wrote it on the back of their flash card.  FYI: Somethings I would do differently- for more than one child ... arrange them so they are all sitting with their number line in the same direction.  My younger student got confused with the forwards/backwards mainly because he was watching K. and it looks the opposite in that regard.  They learn a lot by observation so going back and forth between these two instead of working independently was very benefitial.  I'm also considering creating a visual to go along with plus goes forward on the number line and minus goes backwards.  Should be relatively easy to do.  Typically I use only addition or only subtraction with preschoolers but decided to challenge the children today and help them notice detail by mixing the two together.

A little closer up image...we went up to numeral 10 on the number line.

Tuesday, November 22, 2011

G is for Gobble, Gobble, Gobble!

We didn't get to everything I wanted today but that's how it goes.  We made cookies (see below) and well, they took a bit of time for making and baking and cleaning up.  Ha!  Yep, the clean up probably took the longest!  But it was a fun-filled morning with lots of learning going on...starting with the well received book...
The Gobble Gobble MOOOOOO Tractor Book
by Jez Alborough
www.amazon.com
Check this book out if you haven't seen it before!

A cute little song that we were singing all morning! 

Tune: Pop Goes the Weasel
The turkey is a silly bird.
His head goes wobble, wobble.
He only knows one funny word.
Gobble, gobble, gobble!
The Gobble Gobble game that this blogger posted was a hit here too!  They spun the paperclip on the spinner and put the corresponding colored feather on the turkey. If they landed on "gobble gobble" they had to put all the feathers back on the tray.  They continued until they got all the feathers on the turkey.

Another crafty item we did this week.  I've seen it here and there on the Internet.  Tissue paper, modge podge, dollar store candle holders and battery operated tea lights, wooden knob and hot glue. The tissue paper/modge podge process was great for fine motor with a bit of sensory added in there.  :-P

Turkey cookies the children made from scratch today.  I didn't care for this particular sugar cookie recipe so I won't share it but if anyone knows of an excellent sugar cookie recipe I'd love it if you'd share it!


Shape Review
Simple little book in the Turkey Tot Pack that allowed for review of basic shapes and also the literacy concept of letters making words and words making sentences.  Sight word reading for K. also!  After they finished their booklet they started exploring with creating shapes on the Cordz LapBoard.  Actually I've had this Cordz product since they clearanced them out a LONG time ago.  Been in my "gift" tub and I thought, why not?  Let's use them ourselves.  What a hit!  Simple to use!

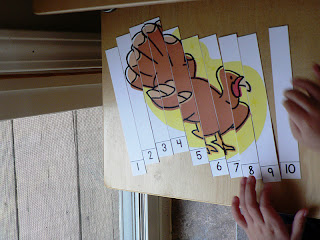
Number Order Puzzle
Not sure why blogger is rotating my picture.  It isn't this position originally.  ??? Anyway, it gives you the idea.  I like these number order puzzles!  Helps them self-correct.  This is one of Madonna and Amber's free printables in their Thanksgiving packs.  They also have 11-20 as well. 


Sight Word Turkey
Excuse that we didn't reallly think ahead about how the words would actually look on the feathers.  :-P  Next time we'll take that into consideration.  These were words that she remembered and wanted to write.  Kind of a neat (very simple-great way to use scrap paper)way to review!
Since our 3 day week turned into a 2 day week, we'll be exploring with the letter G again next week as it's more unfamiliar than some of the others.  Future themes...Gingerbread Man, Gumballs, Three Billy Goats!

Have a safe and happy Thanksgiving!