Showing posts with label letter K. Show all posts

Wednesday, February 8, 2012

K is for Kites (All About Me)

Here is one project that I hadn't posted about yet.   Due to various reasons (mainly because we didn't get it done the first day and we usually don't have a lot of time for "make-up"/finish-up" projects)...we just didn't get to the final touches of the project.  So, today we did!

Very simple but an excellent activity. 
Scissor skills, literacy, art and could be used for various concepts.

We simply cut out the diamond shape from a 12x18 piece of construction paper and because we were taking the "all about me" idea, I put her first letter in the middle of the kite, block style.  It definitely worked out that her name began with K and we were doing kites.  :-)  But it would be no problem at all to put your child's first letter there.  She colored in the K with crayon-and then she painted over top with watercolors.  Later I had created bows with "all about me" fill in the blank sentences such as "My name is _________."  "My family name is _______."  I am ______ years old."  "My favorite color is _______."  She filled in the blanks and we hot glued the bows to her choice of ribbon. Again-simple but one I'd do again.

Other ideas...
Number Kite- have child write numerals on the kite bows.
Consider skip counting.

Alphabet Kite- write alphabet on the kite bows.

Name Kite- use as many bows as letters in child's name. 
Great for a whole class or family and comparing name lengths.

Pattern Kite- create a pattern of colors with the bows.

Texture Kite:  Use various materials or textured paint for the bows.

5 Senses Kite:  Represent a object/material with a drawing/picture on the kite and each bow representing a different sense.

Use your imagination!  I'm sure there are more ways to use these simple kites!


Friday, February 3, 2012

5 Little Kites

5 Little Kites
One little kite in the sky so blue,
Along came another, then there were two.
Two little kites, flying high above me.
Along came another, then there were three
Three little kites, just watch them soar
Along came another, then there were four.
Four little kites, so high and alive
Along came another, then there were five.
Five little kites dancing across the sky,
What a sight to see, way up so high!
-author unknown-

Another small sewing project for K.  :-)  She went through my material tub and chose five that she wanted to create kites out of.  Great conversation can come out of exploring material!  Children can be encouraged to feel different textures, describe what they feel, see, tough, notice patterns and etc.

I had to cut the material with my material scissors but she definitely wanted to "pop" it open and arrange it on the felt background.  We used the same approach as we did with her paper kites and hearts...folding in half and cutting half the shape. 

She also enjoyed looking at my embroidery thread container.  Shades of colors!  Our elementary school doesn't have an art teacher :-( and really they don't even start talking about shades of colors until 1st grade and that for descriptive writing purposes...but I find that this interests preschoolers and so I try to slip it in frequently.   I see we've used enough that I can go get some of my loose skeins of embroidery thread and refill my container!  She used one strand (or two if we needed to cut and start fresh because of an oopsie!) out of the thread with a regular sewing needle for around the kites (her chosen colors) and the rest of that embroidery thread with a yarn needle for the string.  I use real yarn needles instead of plastic ones.  I teach that these are tools not toys and they tend to show caution when using.   She chose her buttons and I did try to teach her how to crochet one line...however her coordination wasn't quite ready for either approach I used (with and without the crochet needle) so she settled for choosing the color of yarn and trying before saying that I could just do it.  But A for effort!  At one time she wasn't so apt at trying these new skill.

I was going to show her how to sew simple triangle bows but by the time we got to this part she was done with the sewing project and that's fine.  If you have an older child...perhaps that's something you'd like to add. 

She enjoys sewing in small doses...and that is what I recommend for this age.  Simple projects and done in multiple sessions. 

Thursday, February 2, 2012

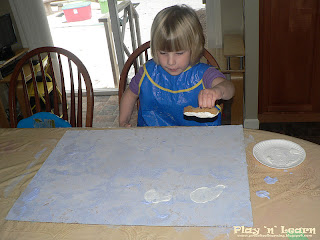
Kitchen Tools and Puffy Painting


Kitchen Tool Painting
 I find that some families hesitate to paint with their children because it tends to be messy.  Yes, it does.  But painting has so many benefits and there are things you can do to help keep the "mess" down.
Plan and Set Up
*  An old plastic table cloth that covers the WHOLE table vs. just where they are painting.  Paint splatters.  :-)

*  If your paint doesn't wash up well (even some washable paints don't wash out very well...especially anything with a red pigment)-then add dish soap to the paint.

* Plan that your child may wish to do more than one painting.  So have extra paper and paint available within arm's reach.  Why?  The most mess happens when you walk away to get something from the other room.  :-)  Better to be over prepared and able to supervise the painting experience.

*  In the picture, you can't see paint shirts but you bet that I use them!  They were on the back of the chairs as that's our routine, so the children can put them on before climbing up in their chair.  I like the plastic heavy duty velcro paint shirts (www.discountschoolsupply.com).  I tend to keep a clothespin clipped to the bottom so that I can clip the neck of the shirt so it's snug and covering all their clothes vs. hanging down and leaving their shirt exposed.  But an old shirt a couple sizes big or even an old adult shirt works just as well!

Microwave Puffy Paint Explorations
inspired by Pinterest
 
Recipe
(enough to fill two Styrofoam bowls about halfway)
1/2 C. flour
2 tsp. baking powder
2 tsp. salt
Mix above ingredients together and add water enough to make a paste.
food coloring (added to individual bowls)

Our take:
*  Neat!  Pancake Puffy Painting!  :-) Yes...smells, feels and looks like pancakes!
Process art- I wouldn't recommend keeping these around for long.  Might call some critters!
*  Use food coloring liberally to make bold colors.
*  The thicker the paint is put on background, the higher it puffs.
*  20 seconds on average in microwave.
*  We started with q tips and moved to baby spoons.  The baby spoons were just about perfect!  Consider adding toothpicks to swirl.
*  Will we do again?  You bet! 

Tuesday, January 31, 2012

K is for Kisses. (Hershey Kisses that is!)

Personalized Hershey Kiss
Awhile back I remembered seeing something similar to this in a search I made in Google Images.  If this was your idea...feel free to let me know so I can give you credit!  :-)
This was a "cute" project.  I turned it in into our scissors skill activity using cardstock.  Really I should have used cardboard so they could wrap the kiss in aluminum foil more independently but then they wouldn't have been able to cut out the kiss on their own.  Hmm...will have to ponder over this one and see what else we could do!

Hershey Kiss Letter Formation Reinforcement
Reinforcing H and K (Hershey Kiss).  Yes, I encourage them to form the letter as we would write it.  Last week we had a really short week for H and so I'm slipping in some letter formation activities this week for H as well as this week's focus letter of K.
K. completes her activities before H. most times and so this tray and Hershey Kisses were perfect for her.  She went on to create...
patterns                 and                 shapes.
She was actually in the the process of making a circle in the above picture but I snapped this picture because it shows that she is creating a circle using the "magic C" formation.  This is something I definitely reinforce over and over and over.

Hershey Kiss Number Line
First the children practiced writing their numerals on their "kisses"...with some children you may wish to do hand over hand while singing the numeral formation verse that corresponds.  They then glued in order onto their paper strip.  Then...
I had created small "flash cards" with simple addition and subtraction signs.  This is not "new" material...we've used number lines with addition and subtraction before.  Good foundation building for Kindergarten.  So they chose one of their "flash cards" and told me what number was first.  They put their kiss on that number.  Then they looked at their math symbol and then looked at me as I crossed my fingers and said "plus" and took one finger away and said "minus".  They then told me what their sign was...we reinforced that plus goes forward and minus goes backward each time.  Then they moved their kiss accordingly, said the answer and then wrote it on the back of their flash card.  FYI: Somethings I would do differently- for more than one child ... arrange them so they are all sitting with their number line in the same direction.  My younger student got confused with the forwards/backwards mainly because he was watching K. and it looks the opposite in that regard.  They learn a lot by observation so going back and forth between these two instead of working independently was very benefitial.  I'm also considering creating a visual to go along with plus goes forward on the number line and minus goes backwards.  Should be relatively easy to do.  Typically I use only addition or only subtraction with preschoolers but decided to challenge the children today and help them notice detail by mixing the two together.

A little closer up image...we went up to numeral 10 on the number line.

Monday, January 30, 2012

K is for kite!

Symmetry Blot Kites
This project required several steps....we started this project first thing and it was completed, for the most part, before lunch.  We just did other activities in between each of the steps that required drying.

1st:  Mixing white and blue paint together to get the *perfect* shade.  Remember when mixing colors that you always start with the lightest color and add a little of the darker colors.

2nd: Painting the background sky color.

3rd: Adding clouds with a sponge, since it is mentioned in the song we sang (see below).

4th: Cutting the diamonds/kites from scrap paper.  Great use of scrap paper! Last week we did hearts this same way.  It's a skill that will benefit them as they get older.  I had a child once who after we had done this folded paper cutting for awhile he started stacking the papers together (other projects) with things I wanted him to cut out that were the same shape.  He told me that if he could cut with our folded paper he can cut his other paper quicker by putting them together.  Wow! Awesome for a 5 year old!

5th: Painting a design on one side of the kite, we used qtips, and folding over to print it to the other side.  FYI:  some children-especially younger ones- will paint both sides of the diamond.  That works just fine as well.

6th: Gluing onto the background and adding other details to create the final display.  We used yarn as a string of the kite.  Squeezing glue bottles are great fine motor as is tracking the yarn along the glue and pressing it in.  You may wish to have a wipe nearby for those children who have a "glue on my finger" issue. ;-P

Kites Song
Tune: Twinkle, Twinkle, Little Star
See my kites up in the sky
Flying past you, oh so high
With the wind, they move so fast
Watch the clouds, moving past
See my kites up in the sky
Flying past you, oh so high!

---author unknown---
If you know to whom I can give credit for this song, please let me know and I will do so.

Hoping for a week that will go smoothly...after the past three weeks one kind of wonders "what will happen next?"  I'm glad to see the snow coming down so beautifully...but a snow day means another missed day and we've already miss so many because of Ms. Amber's situations.  Oh well, go with the flow!