Showing posts with label water. Show all posts

Thursday, March 15, 2012

Letter W

Short and busy week this week so getting to just one more post about our letter W week.  Weather and watermelon and other misc. W activities.  :-)
W is for Weather
Creating a picture bubble map....


Thinking about what we might see out the window during each specific type of weather and then drawing about it.

Maybe I'll just slip in here for you to notice the expression on the girl's face in this picture.  There is a sad face drawn on.  Please don't encourage your child/students to draw only "happy face" drawings.  We are never "happy" all the time.  I do understand that sometimes parents might get the wrong impression because they weren't there hearing the conversation or story that went along with it.  So I encourage you to just jot down the story and send it along with their work.  :-)  Because a child draws a sad face on their person does not mean they are not happy with being in your program or having you as a parent/aunt/uncle/teacher...whatever the case might be.  What that does tell us is that they are learning to express feelings!  In this picture, the child isn't "sad".  This picture the child is "shy", which is what the child was saying but after listening a bit more I encouraged her to use the word "scared" so that she's labeling the feeling correctly.  The adult word I would have used would have been "leery".  :-)  That hill is big, do you see?  The girl is scared to go down that big hill all by herself on the sled.  Note that she is not on the sled...but behind the sled!

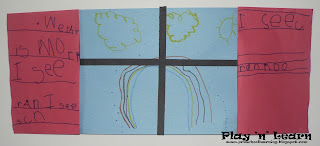
Gluing on strips to make it look like we are looking out a window.
There is another "sad" picture here.  The top picture.  Her brother is now a baby (in reality he's about a year older) and "he's mad because he wants to walk by himself but I have to hold onto him because we need to share the umbrella and he's a baby!"  The middle picture are happy happy people because she was drawing about going to the park with her mom (did that over the weekend).  The bottom picture is obviously a scenery picture.  She's drawing a picture of our trees and my house and the play house.  :-D

Creating "curtains" and writing about the pictures.
Definitely takes more than one session but so worth the process!  See those sight words!  She drew the lines on the paper.  Note that they are getting smaller in between on the left curtain.  :-)  She is becoming to realize that it's a lot easier to write smaller.  This is also a sign of progressing development in writing! 
Science Experiment
A picture similar to what we did was uploaded by a user of Pinterest.  So no site to really take you too.  Was very cool!  Fill the jar partially with water and spray shaving cream on the top.  Use eye droppers top drop the colored water on the shaving cream.  Won't really do it as a "cloud/rain" experiment since there are other experiments that show it a bit better but what a very cool COLOR MIXING experiment!

Water Cycle Song
Tune: Oh My Darling
Evaporation, condensation, precipitation on my mind.
These are part of the water cycle,
and they happen all the time.
 
Top picture you can get at Maggie Lindner Water Cycle Lesson Plan.
The bottom picture is from www.kidssoup.com
Today, we were outside and we were having off and on spring showers.  Yes, we play in the rain when given the opportunity.  :-)  And the kids were in the playscape and pretty soon I hear...Evaporation, condensation, precipitation....  Love it!  We wiggle and raise our fingers with evaporation, clap up high in the air for condensation, and wiggle and lower our fingers for precipitation; we then sign water and rotate our pointer around in a circle for cycle.  Preschoolers LOVE big words!  And it's building a great vocabulary!

I had mentioned with the weather themed math kit that I added the dots to represent touchspots to the numeral on the umbrella mats (where the umbrella are various representation of the number). 
Just before using this activity I decided that really, I want a more hands-on approach to introducing TouchPoints so I simply created number mats with circles.
I really do not plan to do more than allowing the children to become familiar with the concept of touch points as they'll be introduced (depending on the teacher) in most elementary schools.  For our spots I used foam circles, the large size was just under an inch in diameter.  The small foam circles were 1/2 inch in diameter.  Feel free to print your copy of these number mats.  I did include numbers without circles and with circles with the thought in mind that I'll eventually make a set front/back so that those with more experience can add their spots without the guide circle on their numbers.

The TouchPoint image I used as a reference for the children can be found here.

U is for Umbrella
Inspired by Country Fun Lessons.
Obviously this was something we did last week with our letter U.  Well, we started it and...it didn't get finished.  So we finished this week.  


Rainy Day=Muddy Day
----------------------------------------------------------------------------------------------------
W is for Watermelon

Sewing Watermelon Seeds
 Fine Motor/Scissors
They first cut out their half oval and then used a yarn needed and black yarn to create their seeds.  The middle one was mine that I was exploring with.  I used black embroidery thread vs. yarn.  The yarn makes the seeds "pop" out but the thread makes it easier to sew.  So...explore on your own and see what works best for you. 

Watermelon Slushies
Inspired by JuJuBee Preschool
3 C. Watermelon- chunked
1 C. Raspberry Sherbet
1 C. Crushed Ice
4 tsp. Lime Juice
Blend together in a blender.
I wouldn't say these were a favorite but they were much better than I thought they would be!  The lime juice makes it taste like there is Sprite in it.  My husband says it tasted like Watermelon Jolly Ranchers.  The process of cutting up the watermelon and following a recipe and making something for a meal/snack is ALWAYS beneficial though!
We tried the melon baller today for the older children vs. cutting up strips of watermelon like we normally do.  HA!  It was good practice for rotating their wrist but yes, I did have watermelon catapulting through the kitchen and red juice on my walls and floor...but that all cleans up.  We had a good time!

Watermelon Maracas
A good ol' oldie!  Paper plate maracas.  After we cut the watermelon and half and saw how the watermelon's green rind went around the perimeter of the circle, they also painted the one side of their plate, green around the perimeter and red in the center.  We used tempera cakes so that the paint would dry quicker.  They used black crayons to draw seeds.  Fold in half and staple almost all the way around and put your chosen noise maker material out for them to put inside.  Finish stapling and shake!  They had a grand ol' time.  They even noticed how the sounds were different and so I led them to the conclusion that the more beans in the maraca the deeper the sound.

Watermelon Seed Counting
A very giving teacher has made this beautiful file folder game available to us.  You can get your copy at Kindergarten...Kindergarten.
Often, I don't actually create the file folder game out of a file folder because I don't have access to a large laminator.  So I cut out her pages, glued to colored paper and laminated on my personal laminator.  Kids loved this simple activity!
-----------------------------------------------------------------------------------------------
W is for Water
Animals That Live In or Like the Water

A great use of scrap paper to reinforce the shades of blue!  Children snipped at least one of each of the colors onto a tray.  
 
Then they used a paste spread to spread glue in a drawn in rectangle.  They placed their snipits in the glued area.  In the above picture, K. is gluing around the perimeter of her collage and is getting ready to fold the W side down.  Then they added stickers of their choice as long as the animal lived in the water or spent quite a bit of their time in water.
Water Bead Sensory Play
Cool!  I've seen these around on different blogs and could never find them in the stores.  Guess I just wasn't looking in the right spot.  So this week I went through the flower area at Meijer again and voila! I found one container.  Well, after today, we definitely need more than container so as soon as they stock up. 
We explored with putting the water gems into colored water...and yes, they do absorb the colors.  Makes it really neat!  So my own boys have tomorrow off of school so I'm going to put the now blue water gems into red or yellow water and we'll see what happens.  :-)  That color changing adds a whole new dimension to these gems!  Some have expressed concerns about choking hazards.  Any small sensory item can be a choking hazard so sensory (and most other activities) should be supervised.  Some mentioned that these can go "flat".  I've found that they smush and break apart easily.  We had "jello" in the bottom of today's container.  So I don't imagine these will hold to much use but so worth it!  We WILL be purchasing more!  I paid $2.99 for 25 oz container of Water Gems.
-----------------------------------------------------------------------------------------------------
W is for Wagon
These beginnings sound pictures came from
Even Mr. T. wanted to be involved in a wagon!
This is impressive!  He normally steers clear of anything with a glue stick since it gets his fingers sticky but he stuck through this activity...not the typical do one thing and say "I'm done."  He glued the wagon together and then wanted every single picture on the page to put inside of his wagon!  Then he told me he wanted me to put it up on the wall.  :-D  He did pitch a crying fit when I got involved with another child and didn't come right away to help wash his hands.  But once he got his hands washed he was fine.  So PROGRESS!  (For those that haven't been following... T. has some sensory issues.  :-P)

And the one of the things that, without a doubt, makes me smile!
My smile was even bigger today though!  It became very clear to me that K. recognizes the difference between a fiction and nonfiction text.  She was very "informational" in her reading today!

Thursday, December 1, 2011

G is for Goats!


There are so many versions of classic stories! I sent my husband on a search for the book The Three Billy Goats Gruff and the books that we could find at the library...well, I didn't really care for the version or I didn't care for the illustrations.  So today I decided to once again "listen" to the story vs. reading a book.  A very simple, "pleasant", version of The Three Billy Goats Gruff can be found at www.thestoryhome.com.  I did add this site to my favorites as it sees to have a good selection of stories!  With the The Gingerbread Man I added my sequencing cards.  Today, we just listened (while I "acted it out" a little...brought a few giggles) and at the end of the story I asked, "What do YOU think the troll looked like?".  Tee hee!  I'd love to do that with a whole class.  I'm sure there would be some great variations of a troll!  Would make a great display or class book.  Here is K.'s troll!

Retelling the story!
Very simple-wooden blocks, felt, stick puppets of the goats and a troll. 
Another picture to show it's simplicity.

Sink and Float
She knew right off what we were doing today, even though we hadn't truly done a sink and float activity this year yet.  :-)  Then, of course, there was time for free exploration.  Water is always a favorite.  There is just something about it that no child tires of it.   And you can vary it by adding color, bubbles, temperature and the tools can definitely vary.  Great sensory/science experience.    I was going to do a science booklet to go along with this book but there was already enough coloring and cutting planned today so decided to skip it.  So, instead, just simple drew two pictures- sink and float- water line on both.  Boat on one and an object down in the water on the other.  She predicted whether they would sink or float, tested, and then "recorded" by placing object in the correct column.

Rhyming with Goat and Troll
Mailbox Publication
Always trying to slip in rhyming as frequently as possible.  We slipped in the use of the sight word "the" since that word seems tricky for her yet.  Also used this time to label with "kid spelling".  Note that she wrote each sound she actually heard.  PERFECT!

G is for Goat by  Patricia Polacco
Alphabet book regarding goats.  We read this book and used it along with the goats tree map.

Goats Tree Map
This is one of the eight thinking maps that are being used frequently in our schools.  When they begin a "new" tool, I like to introduce it at the preschool level as then it's familiar (the brain connections are already starting to be created) and more easily to learn about and take the tool to the next level when they enter Kindergarten.  This particular thinking map I used to help create a visual on how to write a simple sentence.  Note the colors used.  Green at the top (where we start the sentence), red at the bottom (the end of the sentence).    I actually had a box for her to write the sentence in at the bottom of the sentence and then we cut apart the words and glued them to the paper she'd do her illustration on.  This reinforces spacing between words.  Side note about a tree map:  they work great with science/informational books, use to see what information they have retained!

When I think Kindergarten writing I think...
* Able to print in a way that's readable/legible.
*  Using beginning and ending sounds and some middle sounds when sounding out and spelling a word (some children may already be using more conventional spellings).
*  Correct use of sight words in their sentence(s).
* Basic punctuation.
* Spaces between words.
*  Illustration goes along with the sentence.  May or may not have much detail in either sentence or picture at the kindergarten level (our school's writing program is doing a lot with details in illustrations and sentences).

As a preschool teacher...my goal is to work toward the above goals.  I usually save the sounding out/spelling for activities where they are doing "free writing", such as journals, or labeling pictures and so on.  With an activity like this tree map, I like to do it "copywork" style because then I can point out conventional rules.  With K., we've been doing quite a bit with learning that letters together make words (CVC practice), words together make sentences and there are spaces separating each word in a sentence.  She's doing great!

Tuesday, November 8, 2011

O is for...

O is for Ocean!

Ocean Preschool Pack
This individual has really put quite a bit of work into these little packets and they are free.  We so appreciate individuals like Jolanthe who are so willing to share their work.  If you are one of these people...THANK YOU!  We used a few of the activities that were in this pack today.  I'll place and asterisk (*) next to the activities that were from this particular pack.

Line Tracing*
I was bummin' that this picture is blurry.  She was proud of her work (and should be!) and held it up to me to see.  Unfortunately, digital cameras tend to be a little slower in some regards and I couldn't really "recapture" this picture again.  These lines go beyond the basic that many sites offer.  Takes a bit more "pencil" control.  She did these lines where the younger child was only expected (though he could have chose differently) to do the basic lines due to the amount of effort it would have taken him.  Lines like this are perfect for beginner writers.  Helps to teach left to right, eye-hand coordination and helps them become comfortable with the various types of lines that we will be using as we explore with handwriting.  I laminated this set but to save money you can put the pages inside of sheet protectors and use dry erase markers.  You can use washable markers but they smear much easier, to the frustration of the children and the adults (who have to do the laundry).

O is for Ocean Letter Formation* 
 I encourage children to do "rainbow writing" vs. coloring of sheets like this.  Why?  Number one, coloring isn't something I push.  Actually, many of our activities go home uncolored because I give the option of coloring or not coloring.  Some programs do a lot of coloring sheets saying that it is "necessary for their fine motor development".  Yes, that is what they told me and I'm sure you could figure out what my response was.  Perhaps it does help to a certain extent but I've worked with too many children who find coloring frustrating/boring/tiring and there are so many other ways to strengthen and develop muscles in their hands that we do very little coloring.  With an activity like this, if they colored it, they are missing out on some lovely letter formation reinforcement.  I often place a green dot and add an arrow so they know where to start and which direction to go in.  Then I ask them to use colored writing tools to create a rainbow inside of the letter.  They must use at least three colors but they can use more if they wish. 

Tunnel Letter Formation
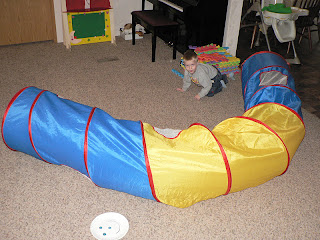
An activity that led into our letter O formation activity was our tunnel. 
Like this picture :-)
 Actually, I pulled out the tunnel for the letter C last week and though we played with the tunnel, we never used it for letter formation, for whatever reason, just ran out of time I guess.  C is for crawl, ya know! :-)  So, with Handwriting Without Tears, the materials all have a smiley face where the children start many of the letters.  However, with the magic C motion, it starts on the opposite corner.  We showed that on the HWT tools last week.  So to reinforce that idea, I created a simple paper plate smiley face for our C and O tunnel formation.  Tunnel moves a bit but it was in the right spot when we started.  :-D  We created a letter C and crawled through it and on O we started in the same spot but I "closed it up" for them to get a sense that they go right back to the beginning.  They enjoyed this, especially with me closing it up!

Water Transfer With Sponge
 I was talking about the various ways to strengthen hands besides coloring.  Here's one.  I'm sure I've mentioned this in a blog before.  I wasn't planning this activity but came across a whale sponge (you can create any shape out of a sponge) when I was looking for a different sponge this morning so quickly added it to our things to do.  :-)  They put the sponge in the bowl and squeezed the water into the measuring cup.  I added blue coloring to allow for a bit of self-correction.  If they spilled the water, they'd see it more clearly. And as you can see below, we got a little pouring practice in as well.  If you have never done an activity like this before...try it!  The children always love this type of thing and it has many benefits one being...it's very easy to set up and clean up! 

Eye Dropper Ocean
 Another water transfer activity that uses eye droppers.  To reinforce our focus letter I just cut out the center of a coffee filter.  They used blue, green, and purple watercolors to drip the colors on their O to make their ocean. When dry (I microwaved for 15 seconds and it was dry enough to glue)  it was glued onto a paper plate and they added ocean themed creature stickers.  I also provided a container so they could explore with various colors on a regular coffee filter as well.  They always do enjoy this!

Art:  Stenciling
 Check your dollar stores for these type of stencils.

Sensory:  Gel
 Just a little free exploration. I used the blue gel since we were doing ocean.  Added a couple tools and ship counters but my main goal was them to explore it with their fingers.  One "wondering" they had was if "this is what a jellyfish felt like?"  :-D

Oean Life Graphing*
 I ended up cutting apart the dice and putting the pictures in our large dice since I can never seem to make the cardstock dice work for me.  Next time I'll plan ahead and use larger pictures and add the picture labels on it as well.  The children took turns rolling the dice and we created a graph and went until one animal reached ten and then discussed it.

How Many Fish in the Ocean?*
 I decided to print this on cardstock and let them make their own and take it home to work with instead of laminating a set here.  Nice even lines perfect for scissor practice. They are narrow and a light gray so you may wish to reinforce them with marker or crayon if your child needs that.

Phonological Awareness:  Rhyming*
Just simply laminated this time since time was short.  Typically I'd cut the pictures apart and make an activity like this into a velcro board.  Always good to get some rhyming practice in there.  Don't just assume they "know it" after they get a few answers right.  On more than one occaision I've known children who could match familiar rhyming pairs (cat/hat, tree/bee, truck/duck) but give them pairs of words that are not typically used in rhyming activities (whale/pail, ocean/lotion) and they were unable to match them, thus they really hadn't mastered rhyming yet.  :-)  So slip rhyming in frequently and use unfamilar rhyming pairs also! 

Word Chunks/Letter Recognition*
The vocabulary cards are from the preschool pack. How we used them today was to find the o's in the words ("highlighted" them), if there were any and if not to reinforce that "none" is the number zero.  Then sort the cards onto the word chunk mat.  Can't see it all that clearly but the top of the columns are hand clapping clipart.

Hope you all had a lovely day.

Wednesday, September 7, 2011

Sand Tray and Water Play

The two activities I think I'll share today are our sand tray and water play activities.  This week, being the first week, we are doing very familiar materials.  That comes from my time with large groups with quite a few new children each year, I guess.  Probably wouldn't need to do that with my kiddos this year but it does allow for comfort to come from familiarity as they begin their school year schedule again. 

Yesterday, our fine motor activity was pouring sand into various containers.  Today we had our sand tray and I added "lines sheet" for them to refer to as they were exploring.  We've introduced Mat Man (Handwriting Without Tears) this week and so we've been talking about lines-sticks/curves, horizontal/diagonal/vertical. 

I mentioned Mat Man...this is not the greatest picture.  We are really short on space so we're going to have to do some rearranging of something...either furniture or ourselves with mat man because he's a good size.  Today the children told me the parts that we needed to create and we sang the song that goes with it.  Then I pulled out our discovery box which I had prepared with shapes and letters and we put our hand inside, choosing one and trying to guess what it was without looking.  Then we created it with the sticks and curves of mat man (which explains why he's missing some parts in this picture.)  One thing I like about the song that goes with mat man as that it goes beyond just naming body parts.  It also gives a simple function and we can also vary it if we want.  The body verse (the blue mat-we'll be using it starting next week to build letters) ends with "to hold what is inside".  So, we've talked about about what's inside our body.  Interesting!  Our Let's Move activity comes soon after this and boy oh boy it got our heart beating pretty fast today.  So neat to see them connecting that observation with Mat Man already.  I think Mat Man is going to be a hit and a great conversation piece along with what it's typical function is. 
For sensory we are working with water this week.  Yesterday, being the first day, we had just plain water with familiar tools for exploration.  They NEVER tire of water play...and so much learning can take place also!  We have the kitchen set out this week and so I pulled a few of the utensils/plates and such and we did some dish washing.   The way I set it up was to encourage order and working from left to right.  The older one really got into the dish washing process. The younger ones were more interested in playing...which is okay also. 

Ha!  Should have taken the picture from the other direction.  Oh well, you all can picture the children sitting so that the yellow tray is at their left.  :-P
Hope your morning went well!