Showing posts with label writing. Show all posts

Monday, April 16, 2012

Rainbow Writing/PreWriting Cards

Rainbow Writing
For a few weeks now we've been doing some gripper work with the 5 year old here.   This Rainbow Writing is a variation of this gripper work, larger-at the wall-no gripper.  (Thank goodness she doesn't care if I'm an artist or not.  Obviously I can't even draw a symmetrical rainbow!)
 
I'm a fan of prewriting cards and often have them available to the kiddos. They are great for teaching left to right progression and help with eye/hand coordination.  These were specific excercises she was to do with a pencil and gripper and I found that these excercises are a lovely "step up" from the preschool cards available.  I created a set of very simple cards by using the lines I like to use for beginner writers and a yellow marker and scanned them in. 
My goal is to use them for older preschool children who need a bit more of a challenge.  They aren't fancy but they do the trick. You can download a copy here if you wish.   The above picture is what the document looks like.  I added paper cutter lines so that after they are laminated you can trim them so they are individual cards.  I did leave one page with lines only so that if you want to create your own (perhaps you have better "penmanship" than I do...wouldn't take much!) you are welcome too.    

Tips: 
*  Laminate and cut apart to be able to reuse.

*  Card 1:  circles...magic c motion 3-5 times, without picking up writing tool, stop switch to the other direction 3-5 times.   

*  All cards should use a continuous movement.  Discourage the children from stopping and picking up their writing tool.  

*  You may wish to use a green marker dot to show the children where to start prior to laminating.  K. asked me to put a green dot on each line.  :-)

*  Don't be concerned about the children tracing exactly on the yellow or getting it exactly right on their own lines.  They'll get there.  It takes time.  The reason why I added the "draw fast" category is because I found that with K., she's overly concerned about getting it just right and really when she doesn't worry about it and she's going faster...she's more accurate.  When she sees this her confidence grows.

*  Allow some choice in colors.  Sometimes all the child needs is a little choice in the activity to make it be a bit more enjoyable.  

*  Encourage responsibility of their work by having them make sure the caps are on the markers and in their container and the cards are wiped clean and put back in a basket or on the tray. 

Easel Work/Vertical Plane Activities:
*  Encourages better posture.
*  Strengthens shoulders, hands, and wrists.
*  Helps keep attention since their work is directly in front of them.
If you don't have an easel or it's not right handy (like ours is more often than not lately) tape the child's paper to the wall or a window.  Or if you are doing free drawing/writing...washable markers at a sliding glass door or window works quite nicely!
 -----------------------------------------------------------------------------------
There are many resources out there for toddler/preschool tracing cards.  Here are four sites to get you stared if you are interested. 

PreWriting Cards in most of her theme packs.

Garden Preschool Pack has cute watering can to flower tracing cards.

Many themed Prewriting Cards
This one was created in connection to the book Mrs. Wishy Washy.

When do you start PreWriting Cards? 
I have mixed age group, my toddlers tend to get introduced to these cards sooner than most children.  Often they just start coloring them because they love the cause and effect of dry erase markers.  :-P  However, a good time to start prewriting cards is when your toddler is scribbling on a paper in a somewhat organized way.  They seem to have a plan and are actually closing up circles intentionally, showing more "writing" vs. coloring/scribbling.  I start to see this type of drawing between 2.5-3 years old.  The steps that I use with toddlers who are just starting these cards is to demonstrate ("watch"), hand over hand, and then "go for it!"  No right or wrong.  They'll progress naturally and then you'll know when to start with letter and number formation.


Tuesday, April 3, 2012

Journals (Draw and Label)

I feel pretty strongly about using visuals with children of all ages.  So, I've really enjoyed many of the anchor charts that I've seen floating around Pinterest/blogs.  Such a great learning tool for the classroom, if they are posted at a level that allows for interaction. The idea behind it really is to have the children brainstorm with you to create the chart and then they can go back and use it as a reference.  However, in my situation, there will never be more than 6 students in my home and even if our plan to homeschool works in our favor, the children will be at different levels of development and on different topics.  So, I can see the child and I brainstorming and creating a chart at a smaller scale and placing the charts in a binder to be later used as a reference point.  Until then, there are a few visuals I can use presently with my PreK students to help them become more independent in their work. 
Not sure why the picture is blurry, it uploaded crystal clear.  Hmmm.  I've had this happen before on blogger.  Any ideas why?   Anyway...will give you an idea of what they look like.

 I see readiness in my older student for a more formal journaling experience.  So the above Draw and Label visual will help her keep on track in our new daily journal that we'll begin after Spring Break.   With our daily journal, we are going to take the route that a journal is a place for her to draw and write about anything she wants.  Things she likes, stuff she doesn't like, how she feels, what she wants to do, etc.  I am not going to emphasize a theme.  My goal is to encourage a bit more creative thinking.  My goal will be for this to become an independent afternoon activity for K.    The Draw and Label Strip will help her remember the process in which to complete her journal entry. We will start out by using the top strip.  Brainstorm, draw, color, label. I plan to use return address labels for her labeling, thus the picture I chose.  One kindergarten teacher suggested the at least 5 colors and at least 3 labels and I'm going to go along with that.   I find that with the children here, unless I remind them to use various colors, they'll use one color for the whole picture.  I'd like for them to add detail to their drawings and so using colors will be the beginning of their additional detail and will eventually lead for them to use color words in their writing.  After a time of our Draw and Label Journals, we'll then move into adding a simple sentence.  When we get to that point, we'll have the sight words she has learned up on the wall.  She will then create her sentence out of the sight words and one of her labels. 

I can already see her smile of pride when she completes her journal pages! Feel free to download your Draw and Label Strips if they'll be helpful to your student(s).

Thursday, March 15, 2012

Letter W

Short and busy week this week so getting to just one more post about our letter W week.  Weather and watermelon and other misc. W activities.  :-)
W is for Weather
Creating a picture bubble map....


Thinking about what we might see out the window during each specific type of weather and then drawing about it.

Maybe I'll just slip in here for you to notice the expression on the girl's face in this picture.  There is a sad face drawn on.  Please don't encourage your child/students to draw only "happy face" drawings.  We are never "happy" all the time.  I do understand that sometimes parents might get the wrong impression because they weren't there hearing the conversation or story that went along with it.  So I encourage you to just jot down the story and send it along with their work.  :-)  Because a child draws a sad face on their person does not mean they are not happy with being in your program or having you as a parent/aunt/uncle/teacher...whatever the case might be.  What that does tell us is that they are learning to express feelings!  In this picture, the child isn't "sad".  This picture the child is "shy", which is what the child was saying but after listening a bit more I encouraged her to use the word "scared" so that she's labeling the feeling correctly.  The adult word I would have used would have been "leery".  :-)  That hill is big, do you see?  The girl is scared to go down that big hill all by herself on the sled.  Note that she is not on the sled...but behind the sled!

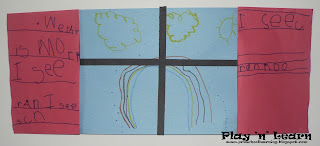
Gluing on strips to make it look like we are looking out a window.
There is another "sad" picture here.  The top picture.  Her brother is now a baby (in reality he's about a year older) and "he's mad because he wants to walk by himself but I have to hold onto him because we need to share the umbrella and he's a baby!"  The middle picture are happy happy people because she was drawing about going to the park with her mom (did that over the weekend).  The bottom picture is obviously a scenery picture.  She's drawing a picture of our trees and my house and the play house.  :-D

Creating "curtains" and writing about the pictures.
Definitely takes more than one session but so worth the process!  See those sight words!  She drew the lines on the paper.  Note that they are getting smaller in between on the left curtain.  :-)  She is becoming to realize that it's a lot easier to write smaller.  This is also a sign of progressing development in writing! 
Science Experiment
A picture similar to what we did was uploaded by a user of Pinterest.  So no site to really take you too.  Was very cool!  Fill the jar partially with water and spray shaving cream on the top.  Use eye droppers top drop the colored water on the shaving cream.  Won't really do it as a "cloud/rain" experiment since there are other experiments that show it a bit better but what a very cool COLOR MIXING experiment!

Water Cycle Song
Tune: Oh My Darling
Evaporation, condensation, precipitation on my mind.
These are part of the water cycle,
and they happen all the time.
 
Top picture you can get at Maggie Lindner Water Cycle Lesson Plan.
The bottom picture is from www.kidssoup.com
Today, we were outside and we were having off and on spring showers.  Yes, we play in the rain when given the opportunity.  :-)  And the kids were in the playscape and pretty soon I hear...Evaporation, condensation, precipitation....  Love it!  We wiggle and raise our fingers with evaporation, clap up high in the air for condensation, and wiggle and lower our fingers for precipitation; we then sign water and rotate our pointer around in a circle for cycle.  Preschoolers LOVE big words!  And it's building a great vocabulary!

I had mentioned with the weather themed math kit that I added the dots to represent touchspots to the numeral on the umbrella mats (where the umbrella are various representation of the number). 
Just before using this activity I decided that really, I want a more hands-on approach to introducing TouchPoints so I simply created number mats with circles.
I really do not plan to do more than allowing the children to become familiar with the concept of touch points as they'll be introduced (depending on the teacher) in most elementary schools.  For our spots I used foam circles, the large size was just under an inch in diameter.  The small foam circles were 1/2 inch in diameter.  Feel free to print your copy of these number mats.  I did include numbers without circles and with circles with the thought in mind that I'll eventually make a set front/back so that those with more experience can add their spots without the guide circle on their numbers.

The TouchPoint image I used as a reference for the children can be found here.

U is for Umbrella
Inspired by Country Fun Lessons.
Obviously this was something we did last week with our letter U.  Well, we started it and...it didn't get finished.  So we finished this week.  


Rainy Day=Muddy Day
----------------------------------------------------------------------------------------------------
W is for Watermelon

Sewing Watermelon Seeds
 Fine Motor/Scissors
They first cut out their half oval and then used a yarn needed and black yarn to create their seeds.  The middle one was mine that I was exploring with.  I used black embroidery thread vs. yarn.  The yarn makes the seeds "pop" out but the thread makes it easier to sew.  So...explore on your own and see what works best for you. 

Watermelon Slushies
Inspired by JuJuBee Preschool
3 C. Watermelon- chunked
1 C. Raspberry Sherbet
1 C. Crushed Ice
4 tsp. Lime Juice
Blend together in a blender.
I wouldn't say these were a favorite but they were much better than I thought they would be!  The lime juice makes it taste like there is Sprite in it.  My husband says it tasted like Watermelon Jolly Ranchers.  The process of cutting up the watermelon and following a recipe and making something for a meal/snack is ALWAYS beneficial though!
We tried the melon baller today for the older children vs. cutting up strips of watermelon like we normally do.  HA!  It was good practice for rotating their wrist but yes, I did have watermelon catapulting through the kitchen and red juice on my walls and floor...but that all cleans up.  We had a good time!

Watermelon Maracas
A good ol' oldie!  Paper plate maracas.  After we cut the watermelon and half and saw how the watermelon's green rind went around the perimeter of the circle, they also painted the one side of their plate, green around the perimeter and red in the center.  We used tempera cakes so that the paint would dry quicker.  They used black crayons to draw seeds.  Fold in half and staple almost all the way around and put your chosen noise maker material out for them to put inside.  Finish stapling and shake!  They had a grand ol' time.  They even noticed how the sounds were different and so I led them to the conclusion that the more beans in the maraca the deeper the sound.

Watermelon Seed Counting
A very giving teacher has made this beautiful file folder game available to us.  You can get your copy at Kindergarten...Kindergarten.
Often, I don't actually create the file folder game out of a file folder because I don't have access to a large laminator.  So I cut out her pages, glued to colored paper and laminated on my personal laminator.  Kids loved this simple activity!
-----------------------------------------------------------------------------------------------
W is for Water
Animals That Live In or Like the Water

A great use of scrap paper to reinforce the shades of blue!  Children snipped at least one of each of the colors onto a tray.  
 
Then they used a paste spread to spread glue in a drawn in rectangle.  They placed their snipits in the glued area.  In the above picture, K. is gluing around the perimeter of her collage and is getting ready to fold the W side down.  Then they added stickers of their choice as long as the animal lived in the water or spent quite a bit of their time in water.
Water Bead Sensory Play
Cool!  I've seen these around on different blogs and could never find them in the stores.  Guess I just wasn't looking in the right spot.  So this week I went through the flower area at Meijer again and voila! I found one container.  Well, after today, we definitely need more than container so as soon as they stock up. 
We explored with putting the water gems into colored water...and yes, they do absorb the colors.  Makes it really neat!  So my own boys have tomorrow off of school so I'm going to put the now blue water gems into red or yellow water and we'll see what happens.  :-)  That color changing adds a whole new dimension to these gems!  Some have expressed concerns about choking hazards.  Any small sensory item can be a choking hazard so sensory (and most other activities) should be supervised.  Some mentioned that these can go "flat".  I've found that they smush and break apart easily.  We had "jello" in the bottom of today's container.  So I don't imagine these will hold to much use but so worth it!  We WILL be purchasing more!  I paid $2.99 for 25 oz container of Water Gems.
-----------------------------------------------------------------------------------------------------
W is for Wagon
These beginnings sound pictures came from
Even Mr. T. wanted to be involved in a wagon!
This is impressive!  He normally steers clear of anything with a glue stick since it gets his fingers sticky but he stuck through this activity...not the typical do one thing and say "I'm done."  He glued the wagon together and then wanted every single picture on the page to put inside of his wagon!  Then he told me he wanted me to put it up on the wall.  :-D  He did pitch a crying fit when I got involved with another child and didn't come right away to help wash his hands.  But once he got his hands washed he was fine.  So PROGRESS!  (For those that haven't been following... T. has some sensory issues.  :-P)

And the one of the things that, without a doubt, makes me smile!
My smile was even bigger today though!  It became very clear to me that K. recognizes the difference between a fiction and nonfiction text.  She was very "informational" in her reading today!

Tuesday, March 6, 2012

U is for Umbrella

Wasn't planning on blogging today because of time constraints but was made proud today by the writing of the oldest student and so "just had to" share.  ;-P
 
The scissors activity today was from The Letter of the Week Curriculum from www.confessionsofahomeschooler.com.  Cut and paste umbrella.  Gluing it on a larger paper allows for room for drawing.  Typically I take dictation after they are drawing but today, on a whim, I pulled out a piece of "kindergarten" paper for K. and handed her a black pencil and said, "Here you go, write me your story."  In the past, she would just look at me blankly and we didn't have much success.  Today, she looked at me blankly for only a moment until she started out, "Once upon a time."  /w/ /w/ /w/ W!  Okay...big smiles here!  I did help out by emphasizing the sounds in the word she was at but did not correct her or tell her about any typical spelling rules/conventions.  She automatically put her finger after the word when she started into the next word.  This is something we've worked on with many other activities.  Cool!  Here's a little closer up...kind of hard to see since she used pencil.
"WUNS UPON A TiM Kenzie WUS WalKe.  ThAN IT STRTD rANe.
Translation:  Once upon a time, Kenzie was walking.  Then it started raining.
Isn't that exciting?!  Phonetic spelling, spaces between words, some lower case letters being written.  Definitely not as long of a story as what I'd get if she was dictating and I was writing but such a leap in the right direction!  We will definitely be spending more time on this path!

And a smile for the younger student also because he wanted the same paper and wrote IT down and told me, "See, I wrote I because I was walking to the store and it started raining."  So definitely in the right direction there for him as well!  One benefit of a mixed age group.  They learn from observing the other.

And while I'm here I'll remind you all of an activity I've posted about before here-phonological awareness.  ALWAYS a favorite. Typically we use a real umbrella with the rain drops inside and we sing "Rain Rain Go Away" and at the end the child flips the umbrella up and they all "rain" down.  Then we work with the raindrops and repeat as interest holds.
Today I had forgotten to grab an umbrella (actually not sure where one is at the moment) so we did it with a blanket parachute.  Not enough kids to use the regular parachute.   They worked together to put the numbers on the raindrops in order.  We did by 1s as an intro because they well know how to do that.  Then we also did by 10s, well K. started it out and H. got the pattern really quick!  Then I introduced counting by 5s.  I did pull our coins back out and talked about pennies, nickles, dimes and showed them briefly quarters (25, 50, 75, 100) but didn't spend too much time on that quarter.

We got quite a bit done today...a very profitable morning.  Wish I had time to share more.  Perhaps another day.  Have a good week!


Thursday, December 1, 2011

G is for Goats!


There are so many versions of classic stories! I sent my husband on a search for the book The Three Billy Goats Gruff and the books that we could find at the library...well, I didn't really care for the version or I didn't care for the illustrations.  So today I decided to once again "listen" to the story vs. reading a book.  A very simple, "pleasant", version of The Three Billy Goats Gruff can be found at www.thestoryhome.com.  I did add this site to my favorites as it sees to have a good selection of stories!  With the The Gingerbread Man I added my sequencing cards.  Today, we just listened (while I "acted it out" a little...brought a few giggles) and at the end of the story I asked, "What do YOU think the troll looked like?".  Tee hee!  I'd love to do that with a whole class.  I'm sure there would be some great variations of a troll!  Would make a great display or class book.  Here is K.'s troll!

Retelling the story!
Very simple-wooden blocks, felt, stick puppets of the goats and a troll. 
Another picture to show it's simplicity.

Sink and Float
She knew right off what we were doing today, even though we hadn't truly done a sink and float activity this year yet.  :-)  Then, of course, there was time for free exploration.  Water is always a favorite.  There is just something about it that no child tires of it.   And you can vary it by adding color, bubbles, temperature and the tools can definitely vary.  Great sensory/science experience.    I was going to do a science booklet to go along with this book but there was already enough coloring and cutting planned today so decided to skip it.  So, instead, just simple drew two pictures- sink and float- water line on both.  Boat on one and an object down in the water on the other.  She predicted whether they would sink or float, tested, and then "recorded" by placing object in the correct column.

Rhyming with Goat and Troll
Mailbox Publication
Always trying to slip in rhyming as frequently as possible.  We slipped in the use of the sight word "the" since that word seems tricky for her yet.  Also used this time to label with "kid spelling".  Note that she wrote each sound she actually heard.  PERFECT!

G is for Goat by  Patricia Polacco
Alphabet book regarding goats.  We read this book and used it along with the goats tree map.

Goats Tree Map
This is one of the eight thinking maps that are being used frequently in our schools.  When they begin a "new" tool, I like to introduce it at the preschool level as then it's familiar (the brain connections are already starting to be created) and more easily to learn about and take the tool to the next level when they enter Kindergarten.  This particular thinking map I used to help create a visual on how to write a simple sentence.  Note the colors used.  Green at the top (where we start the sentence), red at the bottom (the end of the sentence).    I actually had a box for her to write the sentence in at the bottom of the sentence and then we cut apart the words and glued them to the paper she'd do her illustration on.  This reinforces spacing between words.  Side note about a tree map:  they work great with science/informational books, use to see what information they have retained!

When I think Kindergarten writing I think...
* Able to print in a way that's readable/legible.
*  Using beginning and ending sounds and some middle sounds when sounding out and spelling a word (some children may already be using more conventional spellings).
*  Correct use of sight words in their sentence(s).
* Basic punctuation.
* Spaces between words.
*  Illustration goes along with the sentence.  May or may not have much detail in either sentence or picture at the kindergarten level (our school's writing program is doing a lot with details in illustrations and sentences).

As a preschool teacher...my goal is to work toward the above goals.  I usually save the sounding out/spelling for activities where they are doing "free writing", such as journals, or labeling pictures and so on.  With an activity like this tree map, I like to do it "copywork" style because then I can point out conventional rules.  With K., we've been doing quite a bit with learning that letters together make words (CVC practice), words together make sentences and there are spaces separating each word in a sentence.  She's doing great!

Friday, November 4, 2011

C is for ...

C is for Crocodiles!

Crocodile Trace and Race
The other day K and I had a few extra moments so I had created alphabet strips just for this type of occasion and we were going to do the Trace and Race game.  This is where we roll the dice and trace that many parts of a letter starting at A.  For example, if she rolled a 6, she could trace A (3 parts /\-) and B (3 parts).  But if I rolled a 4 I could only trace A and the stick of B.  Then the "race" was on to see who could get to the last letter first.  Well, I get the strips all out and see that we are both missing a J.  ???  LOL  Whatever, can't (well you could but I won't) do it without the whole alphabet and it would have taken too long to print another one so we set it aside.  I decided to do it today with a crocodile. The letters are a lot smaller than my initial strips and if you have a younger child who is not ready for small letters, please use the strips so you can create the size you want.  K. has great penmanship for a four year old and is choosing to write smaller on her own so the smaller letters worked just fine for her.  Great way to reinforce sticks/curves and letter formation.

Crocodile or Alligator?
We learned that crocodiles have more of a triangular look and alligators are more boxy/rectangular (actually, if you want to get specific, the difference is more like V and U.  I'm thinking I'll bring that back up when we learn the difference between the letters U and V).  So she snipped a few crocodiles and sorted into their own "lake".  Also, though they are both from the crocodylidae family, crocodiles' glands on their tongue work better than alligators (to excrete excess salt) so you'll find them more in saltwater lakes and alligators in fresh water.  We didn't really get into the color differences but if you are doing a complete study of the two, crocodiles are more olive green and alligators are so dark of a green they almost look black.  Of course, adding a little more to the activity, she wrote the words "crocodiles" and "alligators".  Also counted and wrote the numbers and added whether it was more or less.

  
Speaking about more or less.  The book we read was called Counting Crocodiles.  All ages seem to enjoy this book!  It's a rhyming and counting book about a monkey who lives on an island with only a lemon tree but he sees a banana tree across the Sillabobble Sea and then decides to be clever and get those bananas by counting crocodiles.  So we incorporated Monkey Math into our work today, prior to doing the crocodiles and alligators sort.  The crocodile more/less sign is from http://www.sparklebox.co.uk/.  K. has a good grasp of more or less but the balance is a great visual to teach or reinforce this concept.  Any balance will do!

And, of course, if we are going to read a book about monkeys and crocodiles we MUST do the rhyme...5 Little Monkeys Sitting In a Tree!  When K. saw my monkeys and crocodile she jumped up and down and said "I LOVE that song!" and started singing a version of it.  :-D  I added magnets to the back of my monkeys and alligator and drew a little scene on the magnetic-dry/erase board so we could "act" out the song.  I couldn't find my container of dry-erase markers so used washable markers instead, which work in a pinch but smears easier than dry-erase markers. 

For art today we talked about filling a paper and how some people sketch out a drawing first before painting.  Cute!  She saw the fuzzy blue yarn we were using for our croc/alligator sort and wanted that for her waves.  That brought a big smile to my face...using her imagination and adding to a project!  So, OF COURSE, after the paint dried we added yarn waves to her sea.  :-D  I also love how she tells me she is done with her work.  She'll look at it, with hands on either side and cock her head and say "It's perfect!". 

Oh yes, Croc Teeth! 
www.sparklebox.co.uk has many playdough mats if you are interested!  This is one of them. (Ha!  In this picture I said, "give me a crocodile smile!")  The words on the top say, "Roll a dice and give the crocodile some teeth!"  So that's what she did.  Another little tidbit of information regarding alligators and crocodiles...a crocodile's 4 tooth on either side shows when their mouth is closed but if an alligator's mouth is closed you can't see any of the their teeth.  This was the planned activity prior to exploring with play-doh without Ms. Amber's "interference".  :-D

And because of illness on both children and my parts...we got way behind in our letter crafts.  So K. did three of them today to catch up.  :-)  Amongst other things since we have PM activities with her also for learning how to read.  Needless to say, K and I are very busy most days and when she told me my computer room was "a mess, AGAIN!"  I had to remind her that the reason why it's a mess is because she and I do so much and I have no time to put it away!  LOL

B is for Butterfly.

R is for Raccoon.

C is for Caterpillar
(We ran out of time yesterday since it was taking us so much longer to do the other activities as we had a very tired lad here.)  I can tell here that we need to work more on writing the letter C.  I actually did not do the exact Handwriting Without Tears routine this week with letter formation.  Hmmmm...this is the first letter that she really has not mastered by the end of the week.  Interesting!  Anyway...by the time we are done with O, Q, G and S she will definitely have that magic c motion down! 

Another activity we did this afternoon that I'd like to share with you as it might be useful for some of you and that is sorting letters by whether they are chicken, giraffe, or monkey.  Some handwriting theories use this thought and the thought of the penmanship lines as a road.  So the chicken are those letters that are small and do not cross the road.  The giraffe are the letters that are tall and go from one side of the road to the other and the monkey tail letters are the ones with "monkey tails" below the line.  Nice little visual for children.  K. is ready to advance to writing on lines so our first activity was to really look at those letters and decide if they were chicken, giraffe, or monkey tail letters.  This was relatively easy for her as I've used the "monkey tail" phrase before and we've done a lot with sorting by sticks and curves.  The printable is at
http://thesmartiezone.com/writing.html.  I just cut the chicken, giraffe and monkey out and placed at the top of the paper to make columns and she sorted our tactile lowercase letters.

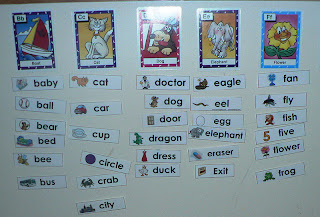
Another quick activity we did this afternoon was listening for beginning and ending sounds.  I'm always on a search of how I can use vocabulary cards (http://www.abctwiggles.com/) differently.  Typically we clap out the words (word chunks) or use them with our read, build, write mat.  But today, K. put the /c/ sound words up on the wall and told me what the beginning sound was (soft or hard /c/) and the ending sound.  I thought that would be a little more difficult but it came easier than I thought.  I think I'll incorporate more of that type of activity- beginning, middle, ending sounds.  I also think I'm going to try to include the word "end" with "last" when we talk about what's first and last in a line of objects because that is still difficult for her to figure out.  She seemed to understand what "end" meant so maybe that'll be the key to help her understand what last means.  :-D  

Oh, so much we do in a day but not enough time to share it all.  I'm sure this child really sleeps well at night.  :-D  I'm always looking for signs of her being tired or not interested but she's almost always seeking more and soaks it up like a sponge and I'm so enjoying myself!    I've actually went back to the Teach Your Child To Read in 100 Easy Lessons this last week because she is so interested in the actual reading of books and I see her "reading" to T. frequently.  So, we'll slip that in our PM activities along with sight word, vocabulary word, writing activities and whatever else gets planned for the afternoons.  :-D  Yep, now you know why I have a disaster of a computer room every single day.  I get it all put away and then the next day's stuff is set inside the door to be put away.  Never ending task...like laundry!