Thursday, November 10, 2011

O is for...

O is for Ovals and Octopus!

Well, didn't have time to post yesterday.  'Twas quite a day.  Anyway, I'll just include two of our oval activities along with some of our octopus activities that we did today.

Quick...change the circle to an oval!
This was a very simple activity that they really got a kick out of.  I added a number component by putting a different number of beads on each pipe cleaner circle.  First we started with talking about the pipe cleaner circles and singing our circle song..."This is a circle, this is a circle, how can you tell, how can you tell?..."  And then I took one circle and quickly pulled it into an oval.  They know what an oval is so it was just reinforcement but that's needed also.

Oval Song
Tune:  Up On the Housetop
I am round, this is true.
But I just might fool you.
One way I'm thin, one way I'm tall.
If you stand me up, I'm sure to fall.
I am an oval, this is true.
I am an oval, did I fool you?
One way I'm thin, one way I'm tall.
If you stand me up, I'm sure to fall.
   Gayle Bittinger
End result, these pipecleaner ovals/circles are perfect for counting.  I will definitely use the bead/pipe cleaner task again because they can move each bead as they are counting.  Perfect!  Love this picture.  The number ten oval is the only one that I created a pattern with.  I'm always trying to slip things like that in to encourage them to look for details.

Oval Frame
Before exploring with circle/oval sponges with painting, I reinforced the shape oval by providing an oval piece of paper to lightly tape on a large rectangle.  She sponge painted around the oval edge and then covered the rest of the paper with paint in order to create a "picture frame".  When dry, K. drew a picture of her "family" inside (which ended up being Grandma, herself, a "new" brother, and a toy octopus  :-D).

Okay, now to Octopus.

5 Little Octopuses
We started out by watching this animated story from www.abctwiggles.com.  I like their animated stories, most of the time.  They do highlight the words as they are reading them.  They are often repetitive which is good also.  Simple stories.  So I printed off the booklet from their sister site (Kids Soup) for the children to cut apart for a scissors task today.

Orange Octopus Playdough Mat
Great for rolling out those "snakes"!  Reinforce the 8 legs fact.  They thought the fact that an octopus can grow back another leg if they lost one was pretty neat.  Of course, they had free exploration with playdough after this task.

Sensory:  Water Play
Well, I forgot to get my octopus from the garage this morning.  Oops.  It was neat to see them use their imagination though.  They turned a globe shaped container into an octopus and a sponge as well.  So turned out well.  Love to see their creative thinking.  Another child used both hands together to be an octopus and wiggled their fingers in the water to make waves.   I think this came from the fact we created a handprint octopus today.  Love to watch them explore!

Handprint Octopus
This is how ours turned out.  I provided oil pastels for them to use for seaweed.  Stickers for the fish.   We had used a sponge to add the blue...oops, it was purple LOL..."texture" to represent water on the paper.  O is for orange so we chose orange paint to print with.  They wanted googly eyes, which they ask for whenever they get a chance.  :-P  Cute.    

We did free exploration on colored fingerpaint paper today as our true art project.  :-)  Actually, I usually use black fingerpaint with this paper because it has more of an effect than other colors.  But!  This was exciting for me...H. is working with the black fingerpaint and said, "Ink! Look this octopus sprayed ink!"  :-D   I hadn't even thought of that!  Yeah!  And of course I wore cream today.  Why, why, why?  Obviously I don't plan my wardrobe around our activities because I could safely say that everytime the kids use black fingerpaint I'm wearing cream or white.  Blah!  LOL

The giant orange octopus.

What's Different Strips
These are so easy to create yourself with clip art.  I love them because it's an easy way to reinforce first/last in a line as well as encourage descriptive language.  I find that many times the children can point out which item is different but when I asked them to tell me why...they have a hard time describing/telling me the reason.  It comes with practice.  Last year K. couldn't tell me the reasons but after a few "what's different strips" this year, she is quick to tell me why they are different.  Making you own allows you to be progressive in the difficulty.  Not sure if you can see it here but the first strip I did had a completely different (including color) octopus.  The second strip was a different octopus but still orange.  The third strip was an upside down octopus.  The fourth strip was a smaller octopus and the fifth strip was a flipped octopus and that one was hard for them.  It was just a very small change...they had to notice the bubbles or the eyes.

Perhaps I'll stop here for now.  Hope you all have/had a lovely day!  We enjoyed watching the short lived snow!  Half day for the boys today...they were bummed that the snow was done by the time they left the school.  But I see more clouds rolling in, they may be in luck.

Tuesday, November 8, 2011

O is for...

O is for Ocean!

Ocean Preschool Pack
This individual has really put quite a bit of work into these little packets and they are free.  We so appreciate individuals like Jolanthe who are so willing to share their work.  If you are one of these people...THANK YOU!  We used a few of the activities that were in this pack today.  I'll place and asterisk (*) next to the activities that were from this particular pack.

Line Tracing*
I was bummin' that this picture is blurry.  She was proud of her work (and should be!) and held it up to me to see.  Unfortunately, digital cameras tend to be a little slower in some regards and I couldn't really "recapture" this picture again.  These lines go beyond the basic that many sites offer.  Takes a bit more "pencil" control.  She did these lines where the younger child was only expected (though he could have chose differently) to do the basic lines due to the amount of effort it would have taken him.  Lines like this are perfect for beginner writers.  Helps to teach left to right, eye-hand coordination and helps them become comfortable with the various types of lines that we will be using as we explore with handwriting.  I laminated this set but to save money you can put the pages inside of sheet protectors and use dry erase markers.  You can use washable markers but they smear much easier, to the frustration of the children and the adults (who have to do the laundry).

O is for Ocean Letter Formation* 
 I encourage children to do "rainbow writing" vs. coloring of sheets like this.  Why?  Number one, coloring isn't something I push.  Actually, many of our activities go home uncolored because I give the option of coloring or not coloring.  Some programs do a lot of coloring sheets saying that it is "necessary for their fine motor development".  Yes, that is what they told me and I'm sure you could figure out what my response was.  Perhaps it does help to a certain extent but I've worked with too many children who find coloring frustrating/boring/tiring and there are so many other ways to strengthen and develop muscles in their hands that we do very little coloring.  With an activity like this, if they colored it, they are missing out on some lovely letter formation reinforcement.  I often place a green dot and add an arrow so they know where to start and which direction to go in.  Then I ask them to use colored writing tools to create a rainbow inside of the letter.  They must use at least three colors but they can use more if they wish. 

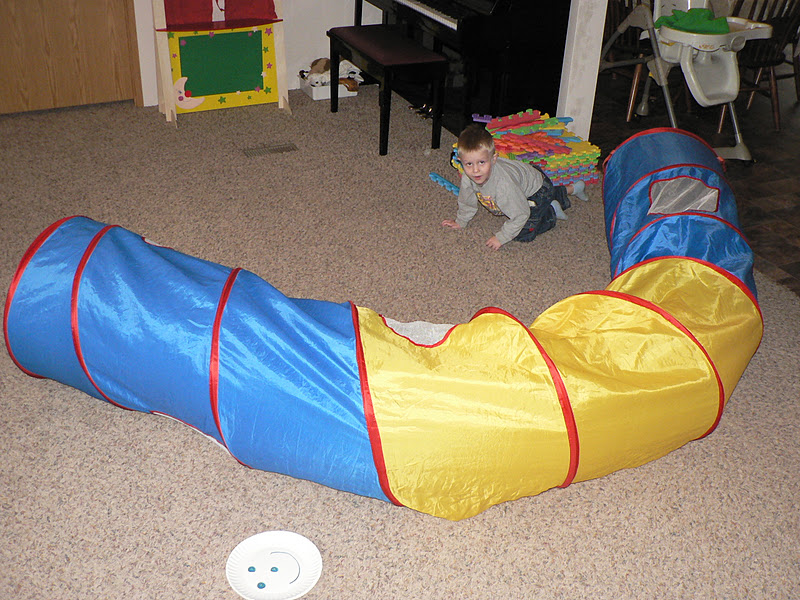
Tunnel Letter Formation
An activity that led into our letter O formation activity was our tunnel. 
Like this picture :-)
 Actually, I pulled out the tunnel for the letter C last week and though we played with the tunnel, we never used it for letter formation, for whatever reason, just ran out of time I guess.  C is for crawl, ya know! :-)  So, with Handwriting Without Tears, the materials all have a smiley face where the children start many of the letters.  However, with the magic C motion, it starts on the opposite corner.  We showed that on the HWT tools last week.  So to reinforce that idea, I created a simple paper plate smiley face for our C and O tunnel formation.  Tunnel moves a bit but it was in the right spot when we started.  :-D  We created a letter C and crawled through it and on O we started in the same spot but I "closed it up" for them to get a sense that they go right back to the beginning.  They enjoyed this, especially with me closing it up!

Water Transfer With Sponge
 I was talking about the various ways to strengthen hands besides coloring.  Here's one.  I'm sure I've mentioned this in a blog before.  I wasn't planning this activity but came across a whale sponge (you can create any shape out of a sponge) when I was looking for a different sponge this morning so quickly added it to our things to do.  :-)  They put the sponge in the bowl and squeezed the water into the measuring cup.  I added blue coloring to allow for a bit of self-correction.  If they spilled the water, they'd see it more clearly. And as you can see below, we got a little pouring practice in as well.  If you have never done an activity like this before...try it!  The children always love this type of thing and it has many benefits one being...it's very easy to set up and clean up! 

Eye Dropper Ocean
 Another water transfer activity that uses eye droppers.  To reinforce our focus letter I just cut out the center of a coffee filter.  They used blue, green, and purple watercolors to drip the colors on their O to make their ocean. When dry (I microwaved for 15 seconds and it was dry enough to glue)  it was glued onto a paper plate and they added ocean themed creature stickers.  I also provided a container so they could explore with various colors on a regular coffee filter as well.  They always do enjoy this!

Art:  Stenciling
 Check your dollar stores for these type of stencils.

Sensory:  Gel
 Just a little free exploration. I used the blue gel since we were doing ocean.  Added a couple tools and ship counters but my main goal was them to explore it with their fingers.  One "wondering" they had was if "this is what a jellyfish felt like?"  :-D

Oean Life Graphing*
 I ended up cutting apart the dice and putting the pictures in our large dice since I can never seem to make the cardstock dice work for me.  Next time I'll plan ahead and use larger pictures and add the picture labels on it as well.  The children took turns rolling the dice and we created a graph and went until one animal reached ten and then discussed it.

How Many Fish in the Ocean?*
 I decided to print this on cardstock and let them make their own and take it home to work with instead of laminating a set here.  Nice even lines perfect for scissor practice. They are narrow and a light gray so you may wish to reinforce them with marker or crayon if your child needs that.

Phonological Awareness:  Rhyming*
Just simply laminated this time since time was short.  Typically I'd cut the pictures apart and make an activity like this into a velcro board.  Always good to get some rhyming practice in there.  Don't just assume they "know it" after they get a few answers right.  On more than one occaision I've known children who could match familiar rhyming pairs (cat/hat, tree/bee, truck/duck) but give them pairs of words that are not typically used in rhyming activities (whale/pail, ocean/lotion) and they were unable to match them, thus they really hadn't mastered rhyming yet.  :-)  So slip rhyming in frequently and use unfamilar rhyming pairs also! 

Word Chunks/Letter Recognition*
The vocabulary cards are from the preschool pack. How we used them today was to find the o's in the words ("highlighted" them), if there were any and if not to reinforce that "none" is the number zero.  Then sort the cards onto the word chunk mat.  Can't see it all that clearly but the top of the columns are hand clapping clipart.

Hope you all had a lovely day.

Friday, November 4, 2011

C is for ...

C is for Crocodiles!

Crocodile Trace and Race
The other day K and I had a few extra moments so I had created alphabet strips just for this type of occasion and we were going to do the Trace and Race game.  This is where we roll the dice and trace that many parts of a letter starting at A.  For example, if she rolled a 6, she could trace A (3 parts /\-) and B (3 parts).  But if I rolled a 4 I could only trace A and the stick of B.  Then the "race" was on to see who could get to the last letter first.  Well, I get the strips all out and see that we are both missing a J.  ???  LOL  Whatever, can't (well you could but I won't) do it without the whole alphabet and it would have taken too long to print another one so we set it aside.  I decided to do it today with a crocodile. The letters are a lot smaller than my initial strips and if you have a younger child who is not ready for small letters, please use the strips so you can create the size you want.  K. has great penmanship for a four year old and is choosing to write smaller on her own so the smaller letters worked just fine for her.  Great way to reinforce sticks/curves and letter formation.

Crocodile or Alligator?
We learned that crocodiles have more of a triangular look and alligators are more boxy/rectangular (actually, if you want to get specific, the difference is more like V and U.  I'm thinking I'll bring that back up when we learn the difference between the letters U and V).  So she snipped a few crocodiles and sorted into their own "lake".  Also, though they are both from the crocodylidae family, crocodiles' glands on their tongue work better than alligators (to excrete excess salt) so you'll find them more in saltwater lakes and alligators in fresh water.  We didn't really get into the color differences but if you are doing a complete study of the two, crocodiles are more olive green and alligators are so dark of a green they almost look black.  Of course, adding a little more to the activity, she wrote the words "crocodiles" and "alligators".  Also counted and wrote the numbers and added whether it was more or less.

  
Speaking about more or less.  The book we read was called Counting Crocodiles.  All ages seem to enjoy this book!  It's a rhyming and counting book about a monkey who lives on an island with only a lemon tree but he sees a banana tree across the Sillabobble Sea and then decides to be clever and get those bananas by counting crocodiles.  So we incorporated Monkey Math into our work today, prior to doing the crocodiles and alligators sort.  The crocodile more/less sign is from http://www.sparklebox.co.uk/.  K. has a good grasp of more or less but the balance is a great visual to teach or reinforce this concept.  Any balance will do!

And, of course, if we are going to read a book about monkeys and crocodiles we MUST do the rhyme...5 Little Monkeys Sitting In a Tree!  When K. saw my monkeys and crocodile she jumped up and down and said "I LOVE that song!" and started singing a version of it.  :-D  I added magnets to the back of my monkeys and alligator and drew a little scene on the magnetic-dry/erase board so we could "act" out the song.  I couldn't find my container of dry-erase markers so used washable markers instead, which work in a pinch but smears easier than dry-erase markers. 

For art today we talked about filling a paper and how some people sketch out a drawing first before painting.  Cute!  She saw the fuzzy blue yarn we were using for our croc/alligator sort and wanted that for her waves.  That brought a big smile to my face...using her imagination and adding to a project!  So, OF COURSE, after the paint dried we added yarn waves to her sea.  :-D  I also love how she tells me she is done with her work.  She'll look at it, with hands on either side and cock her head and say "It's perfect!". 

Oh yes, Croc Teeth! 
www.sparklebox.co.uk has many playdough mats if you are interested!  This is one of them. (Ha!  In this picture I said, "give me a crocodile smile!")  The words on the top say, "Roll a dice and give the crocodile some teeth!"  So that's what she did.  Another little tidbit of information regarding alligators and crocodiles...a crocodile's 4 tooth on either side shows when their mouth is closed but if an alligator's mouth is closed you can't see any of the their teeth.  This was the planned activity prior to exploring with play-doh without Ms. Amber's "interference".  :-D

And because of illness on both children and my parts...we got way behind in our letter crafts.  So K. did three of them today to catch up.  :-)  Amongst other things since we have PM activities with her also for learning how to read.  Needless to say, K and I are very busy most days and when she told me my computer room was "a mess, AGAIN!"  I had to remind her that the reason why it's a mess is because she and I do so much and I have no time to put it away!  LOL

B is for Butterfly.

R is for Raccoon.

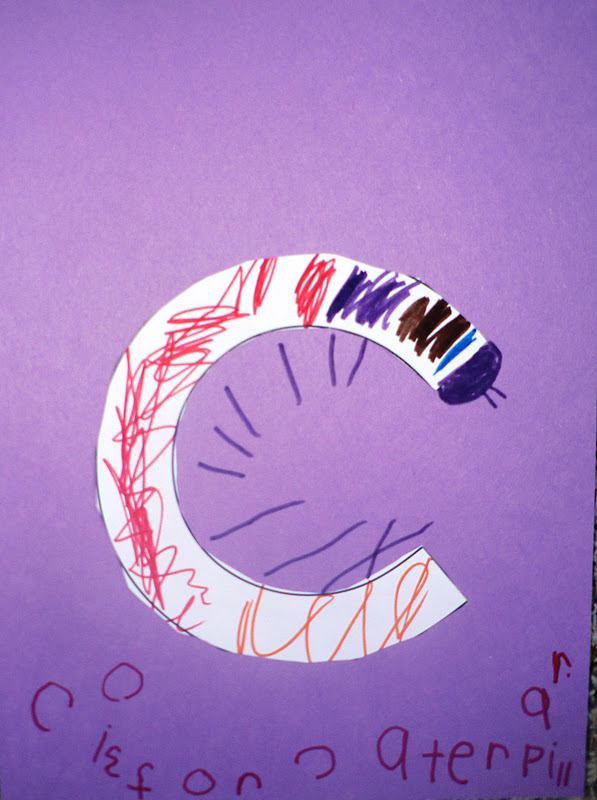
C is for Caterpillar
(We ran out of time yesterday since it was taking us so much longer to do the other activities as we had a very tired lad here.)  I can tell here that we need to work more on writing the letter C.  I actually did not do the exact Handwriting Without Tears routine this week with letter formation.  Hmmmm...this is the first letter that she really has not mastered by the end of the week.  Interesting!  Anyway...by the time we are done with O, Q, G and S she will definitely have that magic c motion down! 

Another activity we did this afternoon that I'd like to share with you as it might be useful for some of you and that is sorting letters by whether they are chicken, giraffe, or monkey.  Some handwriting theories use this thought and the thought of the penmanship lines as a road.  So the chicken are those letters that are small and do not cross the road.  The giraffe are the letters that are tall and go from one side of the road to the other and the monkey tail letters are the ones with "monkey tails" below the line.  Nice little visual for children.  K. is ready to advance to writing on lines so our first activity was to really look at those letters and decide if they were chicken, giraffe, or monkey tail letters.  This was relatively easy for her as I've used the "monkey tail" phrase before and we've done a lot with sorting by sticks and curves.  The printable is at
http://thesmartiezone.com/writing.html.  I just cut the chicken, giraffe and monkey out and placed at the top of the paper to make columns and she sorted our tactile lowercase letters.

Another quick activity we did this afternoon was listening for beginning and ending sounds.  I'm always on a search of how I can use vocabulary cards (http://www.abctwiggles.com/) differently.  Typically we clap out the words (word chunks) or use them with our read, build, write mat.  But today, K. put the /c/ sound words up on the wall and told me what the beginning sound was (soft or hard /c/) and the ending sound.  I thought that would be a little more difficult but it came easier than I thought.  I think I'll incorporate more of that type of activity- beginning, middle, ending sounds.  I also think I'm going to try to include the word "end" with "last" when we talk about what's first and last in a line of objects because that is still difficult for her to figure out.  She seemed to understand what "end" meant so maybe that'll be the key to help her understand what last means.  :-D  

Oh, so much we do in a day but not enough time to share it all.  I'm sure this child really sleeps well at night.  :-D  I'm always looking for signs of her being tired or not interested but she's almost always seeking more and soaks it up like a sponge and I'm so enjoying myself!    I've actually went back to the Teach Your Child To Read in 100 Easy Lessons this last week because she is so interested in the actual reading of books and I see her "reading" to T. frequently.  So, we'll slip that in our PM activities along with sight word, vocabulary word, writing activities and whatever else gets planned for the afternoons.  :-D  Yep, now you know why I have a disaster of a computer room every single day.  I get it all put away and then the next day's stuff is set inside the door to be put away.  Never ending task...like laundry! 


Thursday, November 3, 2011

C is for....

C is for Caterpillar

Art:  Squish Art
They love this type of thing.  I've done it many different ways, margarine lid (started with a film canister glued on for the handle but it didn't stay on), baby food jars, etc.  Any container works.  They were using this slime bottle today and I decided to go ahead and use that for our squish art.  They thought that was cool.  Just plan on them watching the slime during their art explorations!  The paint did go down in the cracks where I couldn't get to it which is a bummer, it seemed pretty much sealed, obviously not as well as I thought.  Oh well.  I love the little "nancy bottles" (http://www.discountschoolsupply.com/).  It allows for the children to have a little more freedom with the paint without me having to worry about them "wasting" too much because the bigger bottles are harder to control.  And yes, they were given opportunity (and took that opportunity) to explore on their own instead of just creating a caterpillar.  :-D

Math:  Caterpillar Graphing
Letter of the Week
We actually are using quite a few of her curriculum support printables today.  I accidentally printed her graph (different theme than caterpillars) book 2 to a page the first time I used her printables.  The children loved it so I intentionally did it this time.  However, with the objects so small I provide a finger pointer so they are sure to count them correctly.  We used a stamp pad and a pencil eraser to make are spaces.

Fine Motor/Math:  Clip It Caterpillars
Letter of the Week
These are actually her floor numbers which I printed 4 to a cardstock sheet and laminated.  Then the children stated what the numeral was and added that many paperclips.  At then end we put them in numerical order.

Sensory/Math:  Size Sort
Letter of the Week
These are Erica's size sorting caterpillars.  I hid them inside a tub of colored rice.   They picked the out and sorted before exploring with the rice on their own.  A word about laminating.  I used to print everything on cardstock and then laminate.  However, one day I forgot to put cardstock in the printer and printed a bunch of stuff on normal weight paper.  What I found out that it usually works BETTER than cardstock for most activities.  Why?  Because the pieces are more flexible.  They are less likely to actually be bent out of proportion.  Now, most of my activities are printed on normal copy paper except for things like our "Clip It" activities where there needs to be a measure of firmness for the children to have success in putting the paperclips/clothespins on.

Fine Motor/Letter Reinforcement: C is for Caterpillar
Letter of the week
This is her C mat that can be used with magnets, pom poms, playdough, or whatever else you want to use them with.  :-P  I like pom poms and tweezers!

So there you have it...a bird's eye view of how our morning went.  Yesterday, I didn't have a voice so we had "Free Friday" yesterday and will do our planned activities from yesterday tomorrow.  Grateful for flexible children.  We pulled out the card table and big blankets, got pillows and blankets and flashlights and read books in the "cave".  :-D  Today I can croak enough to be understood, thank goodness, so back to the "grindstone".  LOL

Tuesday, November 1, 2011

C is for..

C is for cars!

Oh what fun today!  This odd-even number activity was a hit! 
I set up the stage by making a parking lot full of cars (to the left) with numbers 1-10 on them, gas pumps, and a ramp.  They drove a car out, used the pom poms to find out if that number was odd or even.  Then they went to the appropriate gas pump (glub, glub, glub) and then they sent them on their way down that ramp.  The little yellow slips of paper had the words odd and even and a set of dots with buddies on the even and a set of dots with buddies and one without a buddy on the odd.  I was certain to make the ramp go in the direction that the cars could go uninterrupted.  Loved hearing their descriptions of the cars and how far they went, etc.  Also, I loved that even though they couldn't always state the numeral name right off, they would sing the number formation verse that goes along with it!  Then at the end they drove the cars back into a parking space (1:1).  You could even have them put the cars in numerical order if you wanted.  I expect that I'll see a similar set up in blocks during the next few days.  Love how they take something and extend on it. 

Odd and Even
If you are an even number
You always have a pair
So if you look around
Your buddy will always be there.
But...
If you are an odd number
There's always a lonely one.
He looks around to find his buddy
But he's the only one.
Marg Wadsworth

We do odd and even at the calendar every day using the number of the date and craft sticks.  A child passes out the craft sticks to each child as they are counting and then we each count our set and find out if it is equal/more/less comparing each others and then we pair up the sticks to see if we have an "odd one out" or if they all have buddies.  They pick it up quickly!

Sensory: Shaving Cream
 
We read the book Things That Go by Richard Scarry, so we incorporated other vehicles besides cars today during sensory and art. 

Art: Painting With Vehicles
 This is always a fun, open-ended activity.  Can't see it with the end product but one child was actually making letters with the car tracks.  Cool!  Goes to prove that the process is more important than the end product.  Observe them while they work, you'll see alot!

Shape Matching
Pulled out a few of our highway shapes that we used a bit ago.  We worked together to put the shape labels on first, then they matched their shape car (www.childcareland.com) to the shape highway.  Also provided car counters so they could drive around the shape also.  Reminder, for those that may be interested, http://www.makinglearningfun.com/ also has highway letters and numbers as well.

Beginning Letter Sound Parking Lot
I loved hearing them "vroom" around and park in the right spot.  Now on these mats they had p, b, and d.  If you have a beginner---a child that hasn't explored these letters---consider making your own mat so these three letters are not together.  Better to introduce them all separately.  They fall in the category of "easily confused letters".  :-)  Also, this picture reminds me to remind you to go through the pictures first instead of assuming they know what each of the pictures are.  She was asking me what this picture was.  She thought it was a "van" but there wasn't a v on the mat.  It was actually a bus...but wasn't a school bus so she was confused. 

Number Matching Cards
www.childcareland.com (I'm pretty sure I got them there...I've had these for awhile)
When I made this set I laminated two sets each with the cars on one side and number on the other side.  That way they can match sets, either car set to car set or number to number or number to car set.  Today, I provided beads that they could put on each car.  This helps them remember which ones they counted already.

Anyway, that's some of what we did.  You can do so much with vehicles and the children really get into that type of thing!